

How to use Nik Plug-ins (Silver Efex Pro, Colour Efex Pro, Viveza etc) Non-Destructively in Capture One
When DXO announced the latest update to the Nik Collection suite of plug-ins last week, one of the key features is that it now offers a non-destructive workflow when working with Lightroom. When you edit an image in one of the suite’s plug-ins from Lightroom using a Tiff, you can re-edit the image later and have all of your settings loaded on the original image. Well, I’m happy to report that this feature also works with Capture One. Here’s what to do…
Make Sure the Plug-ins are visible
The Nik Collection of plug-ins works with Capture One as external editors, rather than being native plug-ins but that doesn’t really make any practical difference. For most people they should show up once you’ve installed them, in the “Edit With” and “Open With” menus. However, some people have reported that they don’t see the applications in these menus. If that is the case, here are some steps to try:
Step 1: Make sure the “Open In” Plug-in is enabled.
When I updated to Capture One 20, version 13.1 the Open With Menu plug-in was disabled for some reason. If you’re not seeing anything in the Edit-in menu then this could be the reason. To check, go to the preferences, and then the Plug-in tab.
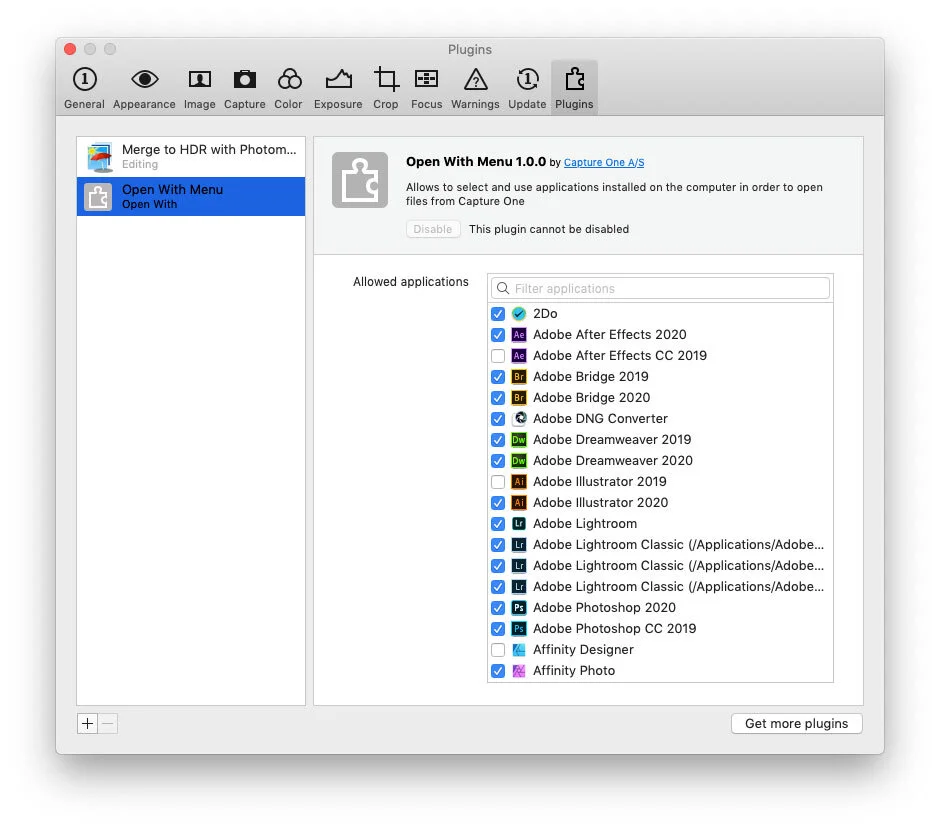
Make sure the open with menu plug-in is enabled. This is not normally something you can disable, but it seems to happen by itself in rare circumstances (I’m not sure why).
Step 2: Launch the applications.
I’ve heard from some Windows users that they can’t see the applications in the menu, but that launching them solves the problem. It may be the case that you need to launch the applications once in order for the system to register them.
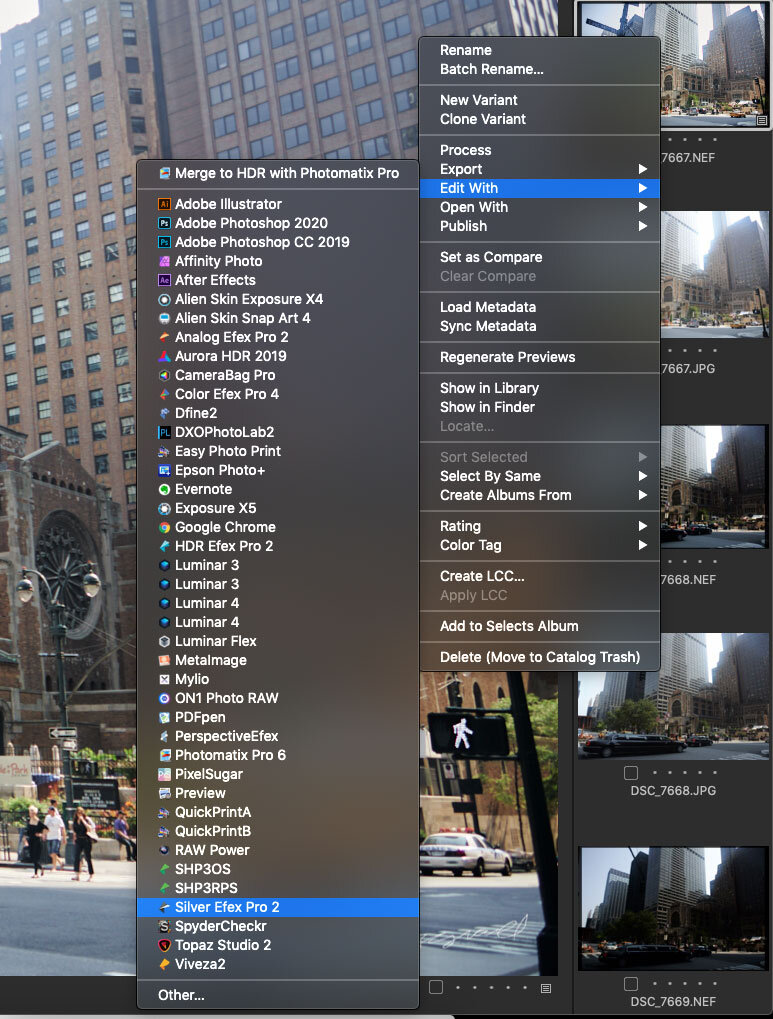
Editing with Silver Efex Pro, Colour Efex Pro etc
Once you make sure that everything is correctly set up, the actual editing process is quite simple. When you want to send an image to edit in any of the Nik suite of applications, simply right click on it in the browser and choose:
Edit with > Silver Efex Pro 2 (or whichever of the applications you want to use)
Make sure to choose “Edit with” rather than “Open With” the first time you edit an image.
This will bring up a dialog box asking you to set some parameters. Make sure you set Tiff as the file format. This is important or the re-editing function won’t work. Even if your original image is a Jpeg, make sure you select Tiff. I also suggest you use 16bit for maximum quality.
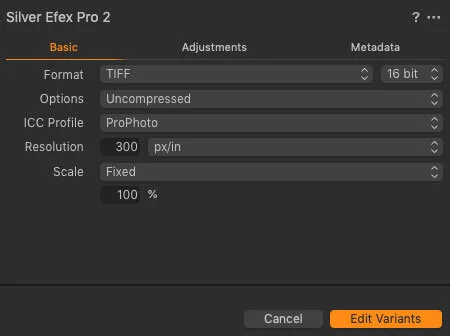
Once you click ok, the application will open (in our example Silver Efex Pro) and you can start editing. When it opens for the first time you will get a notice telling you about Tiff editability and telling you what to do to save for non-destructive editing.
Sending the image back to Capture One
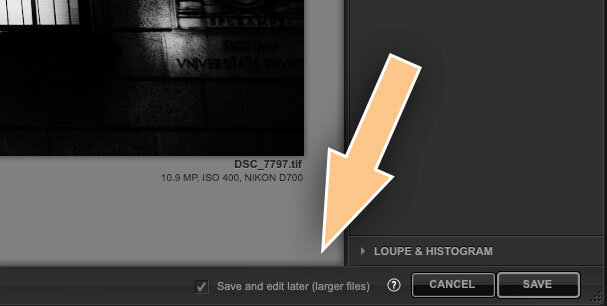
Once you’ve finished editing, it’s time to send your image back to Capture One. This is as simple as clicking save, however if you want to maintain non-destructive editing, make sure to check the box beside the save button.
Beside the Save and Cancel buttons at the bottom right of the interface you will see a check box that says “Save and Edit Later (Larger files)”. Make sure this box is checked if you want to maintain editability and keep the file non-destructive. Otherwise it will save a flattened version.
With this checked, just click Save to send the file back to Capture One.
Re-editing the image
Re-editing an image is also pretty straight forward, but you need to do one thing differently. To re-edit an image you had previously edited with one of the Nik applications, in Capture One, right click on the image in the browser and choose “Open With…” and the corresponding application. Make sure to choose “Open With…” this time. If you choose “Edit With…” it will create another Tiff copy and you will loose your edits.
Once you’ve finished editing again, you just save once more. This will still keep the file non destructive.
So, to summarise, here is a quick reference:
- To Edit the first Time: “Edit With”
- To re-edit a Tiff you have already edited: “Open With”
Limitations
This ability to re-edit a file is a big improvement over the previous versions, where once you save your edits are baked in permanently, but there are a couple of limitations:
- It only works on a per-application basis. So edits you make in Silver Efex Pro will only work in Silver Efex Pro and so on. If you try and open the file in one of the other applications from the suite it will flatten it. Once you open and save from a second application it will kill the editability from the first. You can’t stack edits non-destructively. To do this, you would have to go through photoshop and use smart layers, but I’m not sure how well the applications support smart layers.
- All of the applications support this feature, except for the new Perspective Efex. This doesn’t support the non-destructive editing of the other applications, unless it’s hidden somewhere.
Conclusion
This non-destructive editing ability, while it has its limitations, is a big step up for this suite of applications. While it isn’t perfect and has some limitations, it’s a huge improvement from not being able to use them. While Capture One support is not explicitly stated, it seems to work as well as it does with Lightroom, with the old difference being the commands you use to invoke them and a slight difference in workflow.
Try or Buy Capture One
If you don’t already have Capture One, you can download a 30 day trial now from the company’s website. If you do go to buy it, Capture One Pro is available in both subscription and perpetual licences available, in versions for all cameras, Fuji specific or Sony specific. The Fuji and Sony versions only open raw files from cameras of the respective manufacturers, but other than that, they are identical to the full version. There is also a cut down “express” version for Sony and Fuji Shooters, but this has limited features compared to the full “Pro” version.
Help Support the Blog
This blog is pretty much my day job now and I work to bring you my own take on photography, both tutorials and tips, as well as inspiration from my own art. Running all this isn’t cheap, and so If you like what you see and you want to help keep this all going, I support this work, and my YouTube channel entirely either via sales of my eBooks and Lightroom presets, or the kind support of my readers. (I also have some affiliate ads).
You can see more of my photography and keep up to date by following me on social media and checking out my other websites:


