

Managing Fuji Files in Lightroom Desktop/Cloud/Whatever you call it (i.e. the non-classic version of Lightroom)
Someone recently asked a question on my Facebook group that, I thought, was actually such a good question that I should write a whole blog post, or perhaps even a series of blog posts about. For a long time, I’ve covered just about every aspect of working with Fuji files in Lightroom Classic, but I’ve never really covered some of the techniques for the non-classic version of Lightroom. While most things are broadly similar, many operations are also slightly different or in slightly different spots, so may be confusing to beginners. So in this post, I’m going to cover some of the fundamentals: how to change the film simulation mode, how to set the film simulation mode to what you shot in-camera on import, and how to use the “enhance” function to get better quality images.
Before I get to that, the elephant in the room: What do you actually call this version of Lightroom? Technically, the correct name is “Lightroom: Mac & PC”, but this is both a mouthful and a bit confusing because it doesn’t really differentiate it from Lightroom Classic (as many people colloquially refer to Lightroom classic as just “Lightroom”). Some people refer to it as “Lightroom Cloud” but that’s confusing too as there’s also a web version. Lightroom Cloud can also refer to the whole suite of cloud-based version of Lightroom, and the actual cloud storage that syncs them, so that's confusing too. Adobe internally refers to it as “Lightroom Desktop” so for the purposes of the rest of this article, that’s what I’m going to call it. If anyone from Adobe reads this, please, please give Lightroom desktop a better and clearer name.

How to change the Film Simulation Modes
When you import Fuji files into Lightroom Desktop, by default, they will use the Adobe Colour profile. Now, most people will undoubtedly want to use the colour profiles matching the Fuji film simulation profiles available in-camera, so here’s what to do.
Step1: Switch to the edit mode if not already in it. Do this by pressing E on your keyboard or clicking on the edit button on the side of the interface.
Step 2: At the top of the Edit panel, you’ll see a heading that says “Profile” and beside that is a pop-up menu. By default, this should say “Adobe Color”. If you click on the pop-up menu, you’ll get a list of colour profiles, but this won’t feature any of the Film Simulation profiles. This may confuse some new users. This pop-up menu is actually a profile favourites menu, and you can add other profiles in here, but more on that in a minute. To actually find the profiles….
Step 3: Beside the profile pop-up is the preset browser button. This looks like 4 squares with a magnifying glass icon. Click on this to bring up the preset browser.
Step 4: Once you’re in the preset browser, you’ll find all of your current favourites at the top. This matches those in the pop-up menu. Scroll down to “Camera Matching” and click on the arrow to expand the category, and in here you’ll find the Fuji film simulation profiles.
Hover over any of these profiles, and you’ll get a preview of the result in the main viewer. Simply click on the profile you want to select it.
Step 5 Once you have selected the profile, click on the back button at the top of the panel to return to the normal editing controls
Add film simulation profiles to the favourites menu
If you would like to make this process a bit easier, you can add your most commonly used film simulation profiles to the favourites menu. This means you can then select them from the pop-up menu without having to go into the profile browser.
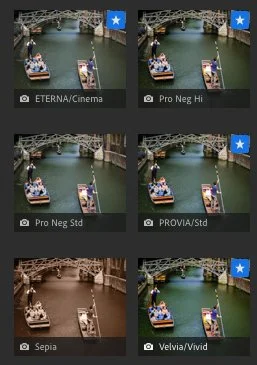
To do this, go to the profile browser as above, and scroll down to the Camera Matching profiles. As you hover over a profile, you will see a little star icon in the top-right corner of the profile’s icon. Click on this star and the icon will turn blue. This has now been added to the favourites menu, and you should be able to find it in the pop-up menu now. Do this for all the profiles that you want to show up in the menu.
Automatically apply film simulation profile on import to match the one you used in-camera
If you wish to apply the film simulation that you used in-camera when shooting automatically when you import your raw files, then there’s a way to do this in Lightroom desktop. Here’s what to do:
Step 1: From the “Lightroom” menu on a Mac, or the Edit menu on a PC, choose “Preferences”
Step 2: When the preferences window opens, click on the Import tab.
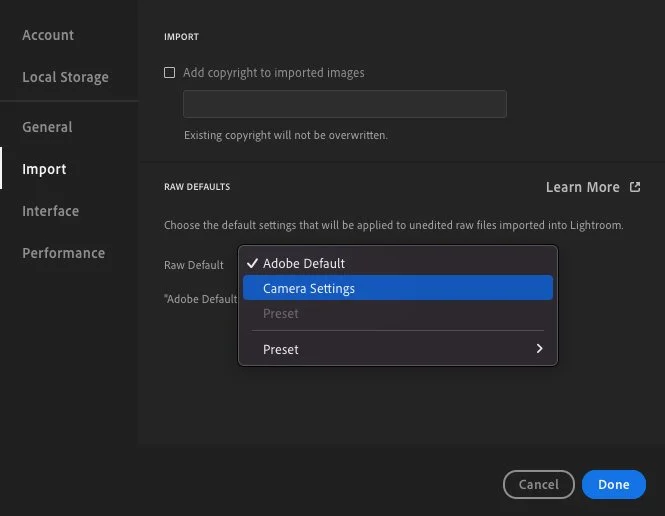
Step 3: You will see a pop-up menu for Raw default. By default, this will be set to: “Adobe Default”. Change this to “Camera Settings”. You can now close the preferences window. From now on, any time you import Fuji raw files into Lightroom, they will use the colour profile corresponding to the film simulation mode you used in-camera.
Using Enhance
If you want to use enhance to improve the deomsaicing quality of your images, you can do this easily in Lightroom. However, compared to Lightroom Classic, there is one important thing to be aware of.
Because Lightroom Desktop is based on cloud storage, and because files that you have used Enhance on are quite a bit larger than Raw files, they can quickly use up your cloud storage allocation. For this reason, I strongly recommend that you use Enhance sparingly with Lightroom Desktop.
Note: If you’re unclear as to why to use Enhance, or what enhance even is, I have a detailed report on the tool for Lightroom Classic. Most of the advice and details on that post apply to Lightroom Desktop, so if you’re unfamiliar with the function, read that post first.
To use enhance on a Raw file in Lightroom Desktop, simply right-click on an image and choose “Enhance” from the pop-up menu. This will bring up the Enhance options window.
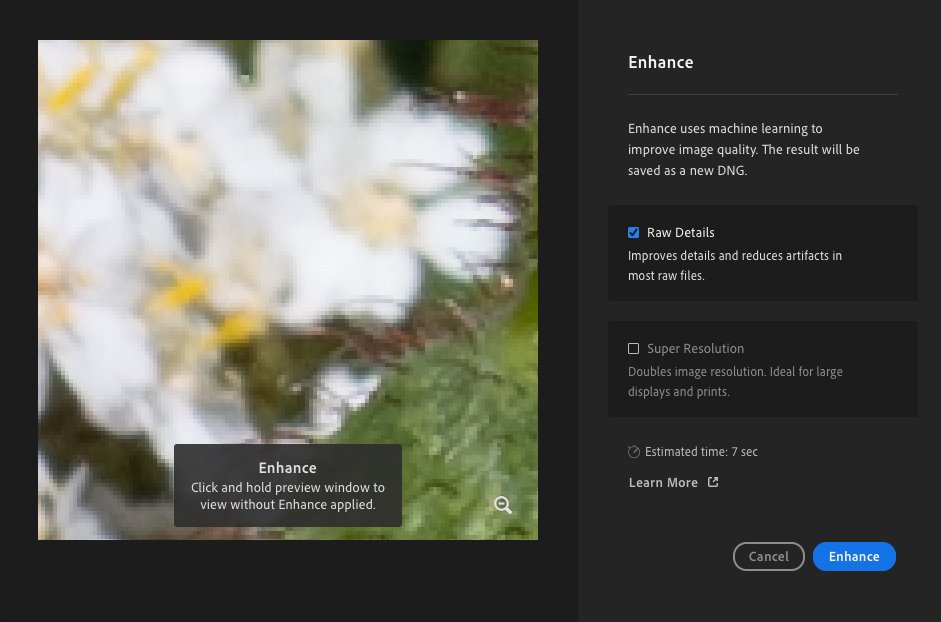
You will see two options. “Raw Details” and “Super Resolution” both with checkboxes. Make sure Raw Details is checked on, and Super Resolution is unchecked (unless you specifically want to use super resolution). Click on enhance to start the process.
Unlike with Lightroom Classic, there are no options regarding the stacking of results. This happens automatically, whether you want to or not.
When the process finishes, you’ll be presented with the enhanced DNG version of the image, and on the thumbnail you will notice a little “2” to indicate that this is a stack. (If you had created other versions, this number may be higher than 2) If you want to get back to the original RAF file, click on the little “2” icon to open the stack. This will open the stack in its own filmstrip, and here you can select either version. To exit the stack, click on the “X” icon on the top right of the filmstrip.
Summary
That’s pretty much it for now. If you have any questions, or any other things you want me to focus on, please don’t hesitate to ask in the comments below.
Just to be clear, I’m not advocating for using Lightroom Desktop over Lightroom Classic. There are still too many shortcomings, in my opinion, for the way I use the software (such as the lack of plug-ins). However, I do realise that this is just my use case, and there are plenty of people out there, for whom this is a good enough, or even preferred option. It also has its advantages, with things like the built-in community option, and preset finder, as well as the ability to sync full res images across devices. So, if you want me to cover Lightroom Desktop, cloud, or whatever you want to call it, please let me know in the comments below.
Help Support the Blog
Buy from our affiliates
If you want to help support our blog, you can do so if you buy anything from our affiliate partners:
- Nik Collection from DXO Labs
- DXO Photo Lab
- DXO Pure Raw
- If you don’t already have Lightroom, Photoshop or Adobe Creative Cloud, you can sign up here.
If you buy through the above links, we get a small commission, which helps run this site.
Check out my Capture One Style Packs, Lightroom Presets and eBooks
If you’re looking for some Film Effect, or black and White style packs for Capture One, Presets for Lightroom or Photography related eBooks, check out my Gum Road Store.
Buy me a coffee!
If you want to say thanks or help, then you can feed my caffeine habit and buy me a coffee via PayPal with a one off donation to my PayPal tip jar. (Please note that PayPal doesn’t make it easy to respond to these so just know you are thanked in advance)
Join our Facebook Group
If you want to discuss anything you’ve read here on my website, or saw on my youtube channel, or if you want to share images you’ve created using any of my techniques or presets, then I’ve started a new Facebook Group just for that.
Note that this post contains paid affiliate links. We get a small commission for purchases made through these links, which helps run this site.


