
What to do if your lens isn’t supported by Capture One - Use DXO Pure Raw
I haven’t been using Capture One as much over the past year, and it’s for one simple reason. The lens I have with my Canon R6II isn’t supported by the software. Now, I could get into how ridiculous that is as the lens in question, the Canon RF24-105 f4-7.1 is a kit lens on several of Canon’s Cameras, but instead I’ll focus on a solution. Based on some of the comments on Reddit and Capture One’s own forums (before they inexplicably closed them) I know this isn’t the only mainstream lens not supported. So if you still want to use Capture One, but you need lens corrections, there is a solution. It’s not ideal, but it does solve the problem. Enter DXO Pure Raw.
Why do I need extra software?
So why do you need to do this step? Unfortunately, many modern lenses, particularly less expensive ones, have significant distortion that requires software base corrections. Without that, the image is significantly distorted. While Capture One does have a generic distortion correction, this requires you to manually set the amount on each image you use. Not only that, but it still doesn’t account for variations in the distortion across the frame.
Raw file from the Canon R6II with 24-105STM lens - Note the Distortion
The Jpeg File showing what the image should look like.
This is where Pure Raw comes in. While this isn’t the primary function of Pure Raw, it will work for this purpose. The other software that does this as far as I know is Iridient Digital’s Transformer series. That requires different software depending on your camera, though, which is why I’m suggesting Pure Raw as a solution.
Isn’t Pure Raw for Noise Reduction?
While Pure Raw’s primary selling point is its “Deep Prime” AI-based noise reduction, it also uses DXO’s lens modules for distortion correction. The lens modules are carefully measured mathematical models of lens and camera combinations. This allows the software to correct for lens distortions and aberrations. I had a blog post recently on what goes into the calibration, but the upshot of this is that it bakes the corrections into a linearised DNG file that Capture One can then read with the lens corrections already applied. This way it doesn’t matter whether the lens is directly supported or not.
The Downside?
There are two downsides to using Pure Raw for this process. The first is of course the time it takes to batch process a whole set of images. Pure Raw can be a bit slow (compared to Adobe’s Enhance for example) although it depends on your hardware. The second downside is the size of the files. Linearised DNG files inherently take up more space than a RAW file because of the different way each store information. DNGs using this process are about two to three times the file size. Some software allows you to use lossy compression to deal with this, but this is not yet supported by Pure RAW.
The Process and Recommended Settings
If you’re going to do this on a batch of images, I suggest you process the batch before you import them into Capture One. I also suggest you change some of the settings.
Note that at the time of writing this, Pure Raw 5 has been announced but not yet released. This may change some of the recommended settings and terminology, and I will update this post when it is released, and I’ve had time to test the results
Step1: Import Your Raw files into Pure Raw
Pure Raw Batch
To start, import all your RAW files into Pure Raw in order to batch process them. You can select them from the finder (or Windows explorer) and drop them on the open window. Pure Raw does include a function to directly import from a capture card, but for the purposes of this demonstration, I’m just going to assume you have the images on your computer. There is also a finder extension if you’re on a Mac, but I prefer to manually import them so I can get a visual reference of what I’m doing.
Step 2: Go To Process your Images
This is where things get a bit confusing. Don’t choose “Process with Preview”. It may seem like the logical step in order to change the settings, but if you do this, it will only change the settings for the current file. (They really need to improve this in my opinion) so instead just choose “Process”. This should then ask you to confirm your settings. You will see sections for “Corrections” and “Output”. If you hover your mouse over the settings you get the option to edit each section. Make sure to change both the correction settings, and the output settings. Here are my recommended settings:
Corrections:
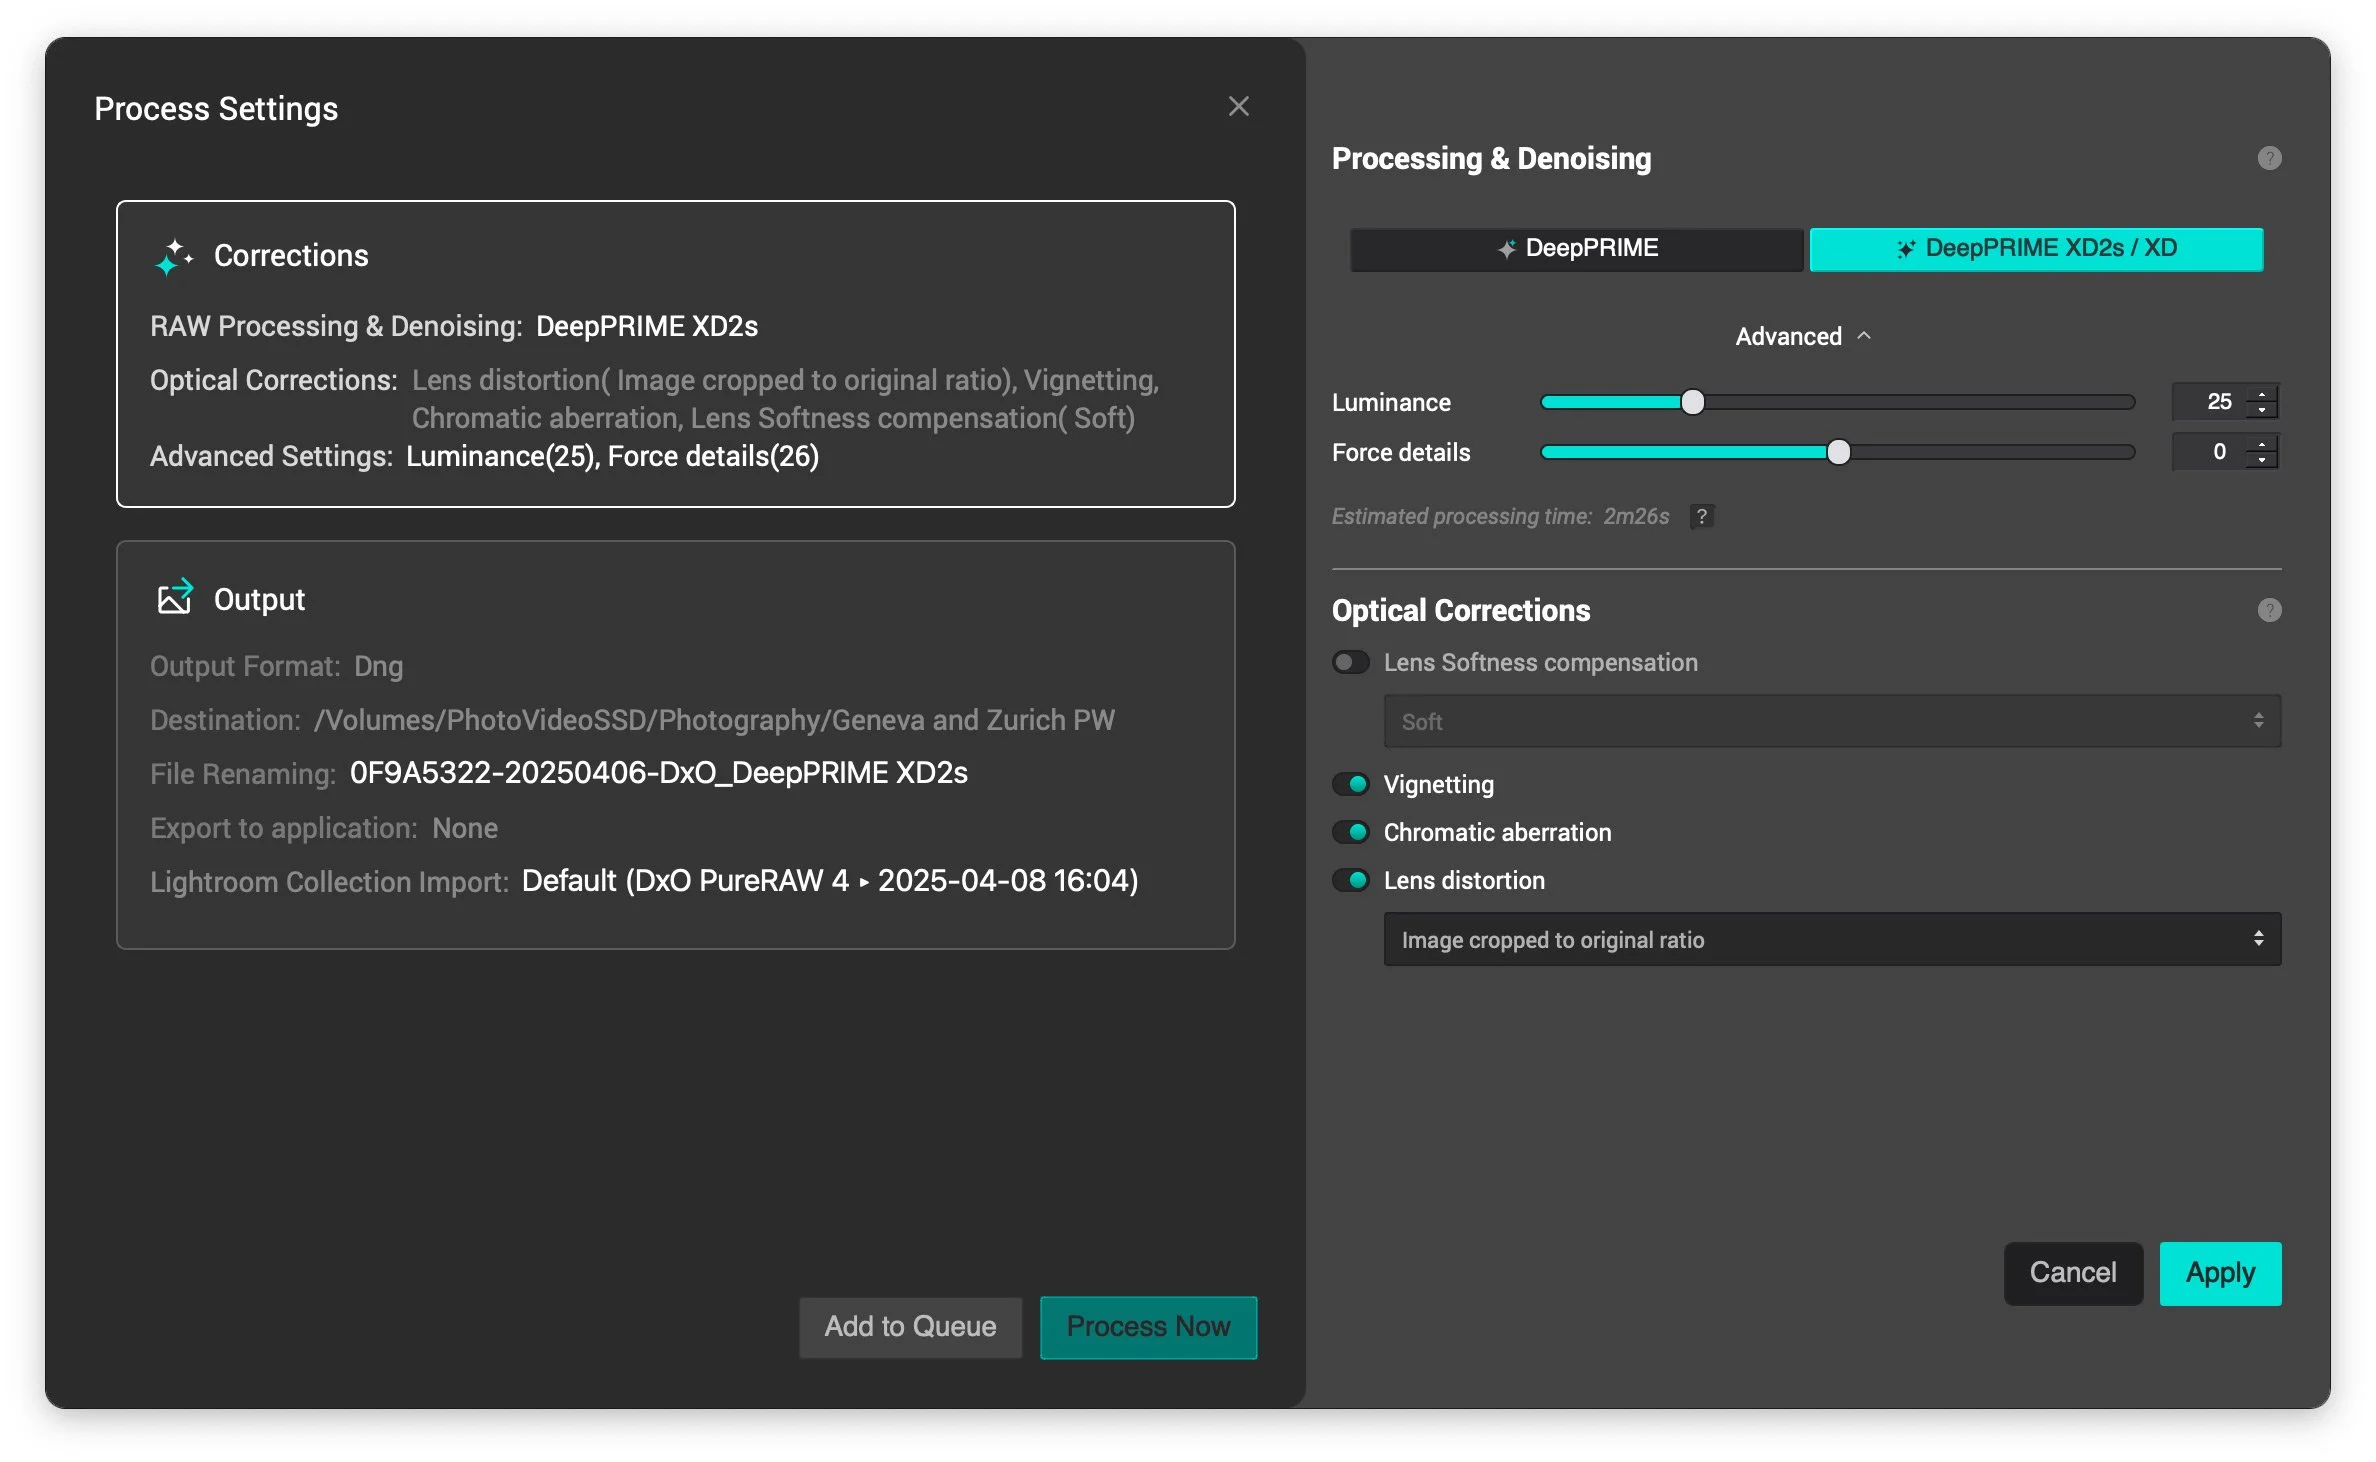
First set your Corrections settings. Note that you will only have to do this once. It should remember them the next time you go to do a batch.
- Set Deep Prime settings to DeepPRIME XD2s / XD
- Click on Advanced if the advanced settings aren’t revealed
- Set Luminance to 20 (if you are primarily working with low to medium ISO images - We're not trying to do too much denoising here - but for the model to work it needs to be set to something)
- Set force details from zero to 25. If it’s a lot of detail or texture in your images, and you want to enhance it, set it to a higher amount, but you can leave it set to zero if you would like to do minimal processing.
- Turn off Optical Corrections. This may seem counterproductive, but in my opinion it can over-sharpen the image, especially if you have fine details. You should try it both ways, but for an overall batch recommendation, I turn this off and rely on Capture One’s sharpening.
- Leave everything else turned on
Hit Apply to save your settings
Output
Now set your output settings. I suggest setting a custom folder and manually selecting the folder where you want the images to go.
- Output Format: DNG
- Destination: Custom Folder and set the destination (do this for each batch)
- File Renaming: Lave as default
- Export: Leave as Don’t Export after Processing. You can set this to open Capture One, but I’ve had issues with this, so I prefer to add the images manually.
- Leave Export with Original RAW off
Hit Apply to save your settings
Step 3: Process your Images
You can now hit “Process Now” to begin the process. You can also add images to a queue and queue up lots of batches, but in this case, I’m just going to process this batch.
Images should now start to process, and you should see the status bar at the bottom.
Step 4: Import To Capture One
Once your images are finished processing, you can import the files into Capture One. How to do this depends on whether you’re using a catalogue or a session. If using a session, you can just navigate to the folder in the folders tab, and you can access the image straight away. If using a catalogue, you will need to import the images using the normal import process.
Once your images are imported, you can work away as normal. Once thing you may find is that even with the lens softness corrections turned off, your images may be too sharp depending, on your tastes, so you can turn the sharpening down, but it really depends on the image. Everything else should behave as if it is a normal RAW file.
Capture One Raw File
Same Image Processed with DxO Pure RAW
Conclusion
As I said at the start, this is something that, in an ideal world, you shouldn’t need to do. Hopefully, at some point you won’t but if you have a camera and lens combination that doesn’t work with Capture One, then this is a way to solve the problem. Incidentally, this also works with other software that doesn’t support lens corrections, such as Apple’s PhotoMator.
Incidentally, DXO Pure Raw is currently at version 4 but version 5 has been announced and at the time of writing this, if you buy it now you’ll get a free upgrade to version 5.
Help Support the Blog
Check out my Capture One Style Packs
If you’re looking for some Film Effect, or black and White style packs for Capture One, check out my Capture One styles on my Gum Road Store.
Buy me a coffee!
If you’d rather not use Patreon, but still want to say thanks or help, then you can feed my caffeine habit and buy me a coffee via PayPal with a one off donation to my PayPal tip jar.
Note that this post contains paid affiliate links. We get a small commission for purchases made through these links, which helps run this site.