
How-to Background Process Denoise in Lightroom Classic 14.4 (and other AI Settings)
The 14.4 update to Lightroom caused quite a degree of consternation with its changes to how the software handles Denoise, Raw details and Super resolution. While I prefer the new method of applying these tools, some people really preferred the old way of creating DNG files. One of the biggest complaints I received, which is totally valid, is that when batch processing Denoise with the new method, it no longer updates in the background. If you’re doing a lot of images, this can take over Lightroom for minutes or even hours. After a bit of trial and error, I have found a way to get this to work in the background. It’s not perfect, and it’s a bit of a hack, but it means you can process hundreds of images without it taking over Lightroom.
The trick? Use Camera Raw.
Somebody made a good case in one of my previous videos on this topic. They were a concert photographer who relied on Denoise for their concert photography, and they pointed out that they might have hundreds or thousands of photos to process at once, depending on the gig. In the old version of Lightroom, you could process these to DNG, and it would work away in the background, albeit at the expense of some processing power. With the new version because the process to update the AI settings happens in a modal dialog box, it takes over the whole software, essentially locking out Lightroom while it is processing.
I wanted to see if there was a way around this. At first, I thought that maybe you could sync to the cloud and use Lightroom desktop to achieve this, but that’s really messy and would take ages. Then I had an epiphany - what if you could just do it with camera RAW. I wasn’t sure if it would work as I wasn’t sure where the AI information is actually stored, but I tried it and it does. It seems to store the data in an extra .acr sidecar file - which seems to be read by Lightroom when you re-sync the folder. Anyway - regardless as to how it works, it appears to work.
There are a couple of ways to go about this, but I wanted to find the easiest way possible. So in the video above and the steps below, I show you what, I think, is the quickest and simplest way to do it. You can also use Bridge to get to camera RAW and that seems to work too. Anyway, here’s the step-by-step guide on how to do this.
Step-By-Step Guide on How to background process Denoise using Camera RAW
There’s one caveat before I start. You shouldn’t continue to work on images in Lightroom while they’re processing in camera raw, as it will overwrite the changes you’ve made in the meantime when it finishes. If you have a large number of images, and you want to start working on some of them, then you can do them in batches.
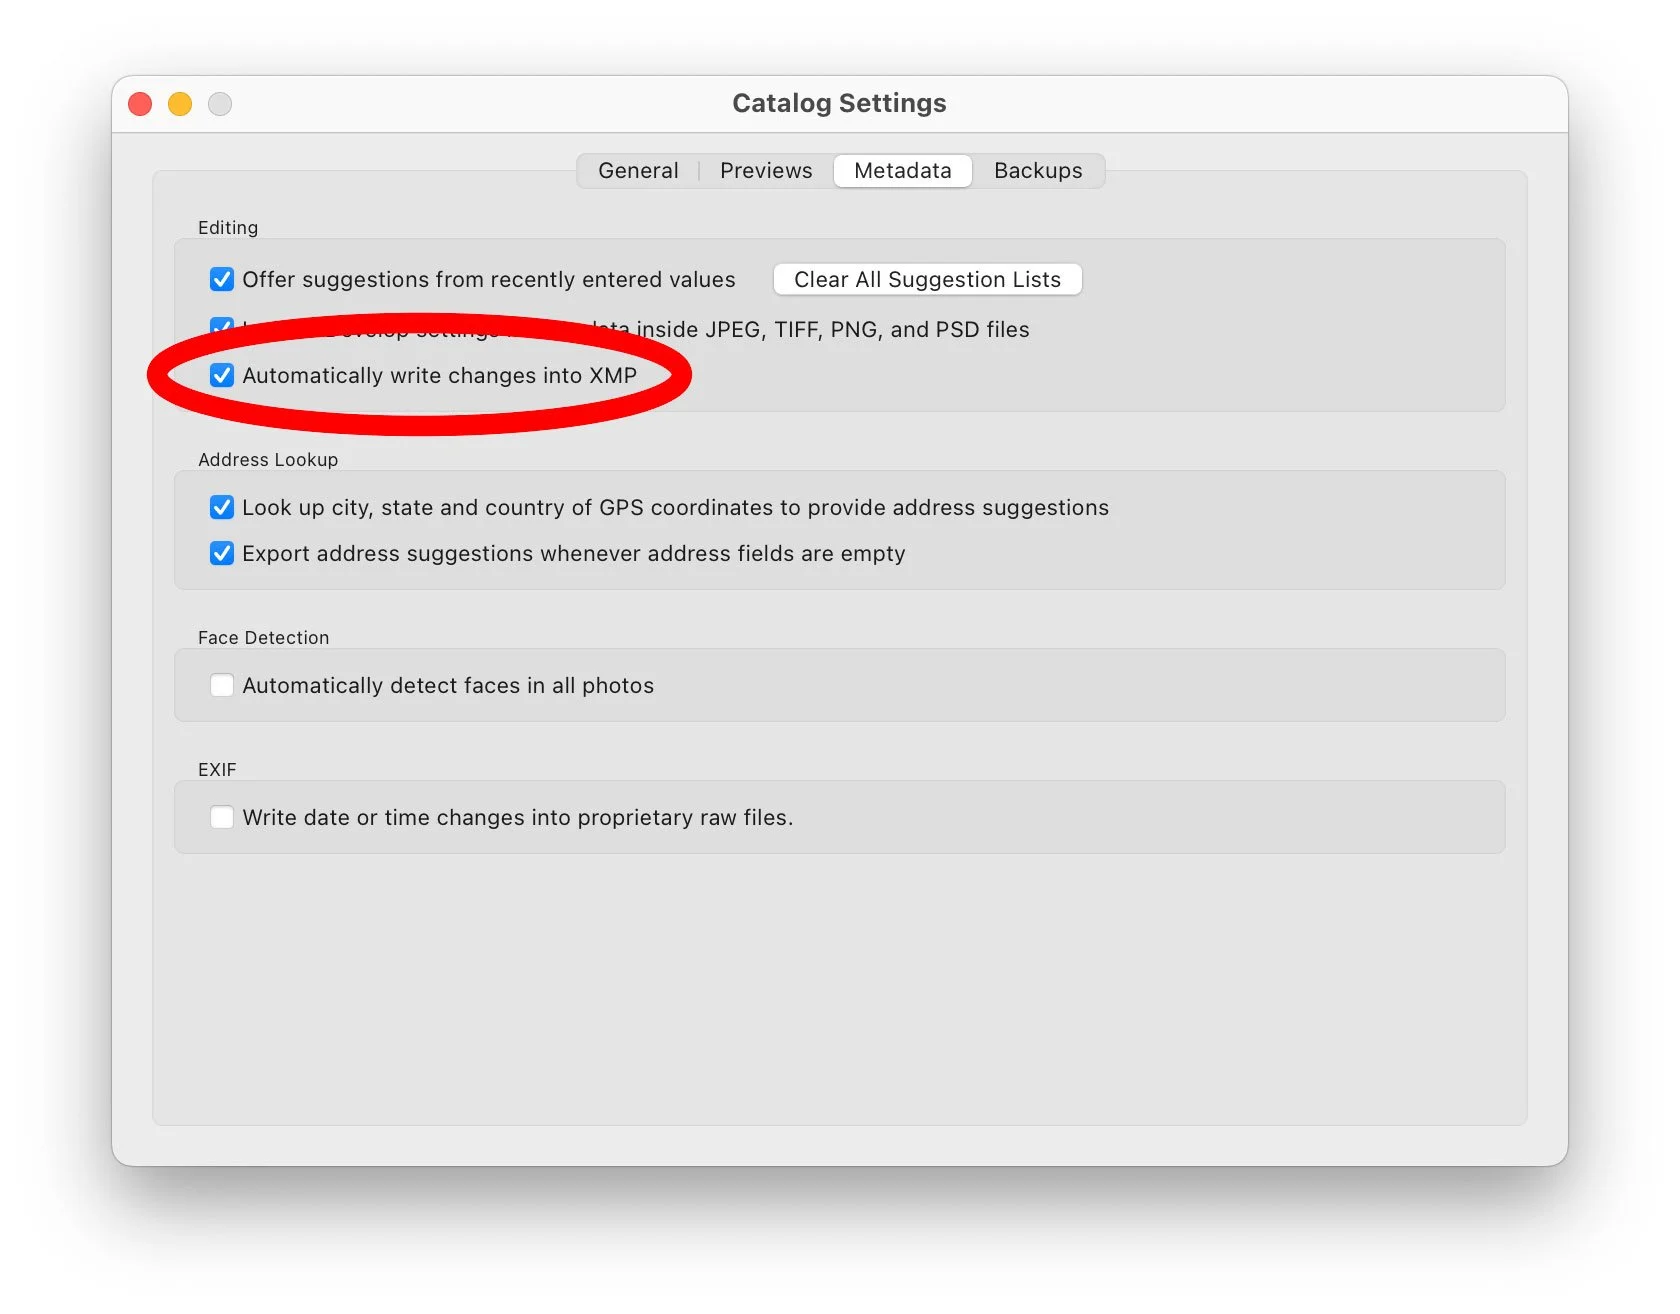
Secondly, and this is really important. In the “Catalogue Settings” for your catalogue, make sure that the option to “Automatically write changes to XMP” is turned on. You need this so that any existing edits aren’t lost when you send the images to camera raw.
Step1
The first thing to do is, in the library module of Lightroom, select all the images on which you want to apply Denoise. Make sure you are in grid mode.
Step 2
With the images selected, drag these images from Lightroom onto the Photoshop icon in the dock on macOS. (I’m not 100% sure of WhatTheFont equivalent is on Windows - but I think you can drag them to the open Photoshop Window).
This is super important. DO NOT USE the “Edit in Photoshop” command. This won’t work as it makes tiff files instead of just sending the RAW files.
Step 3
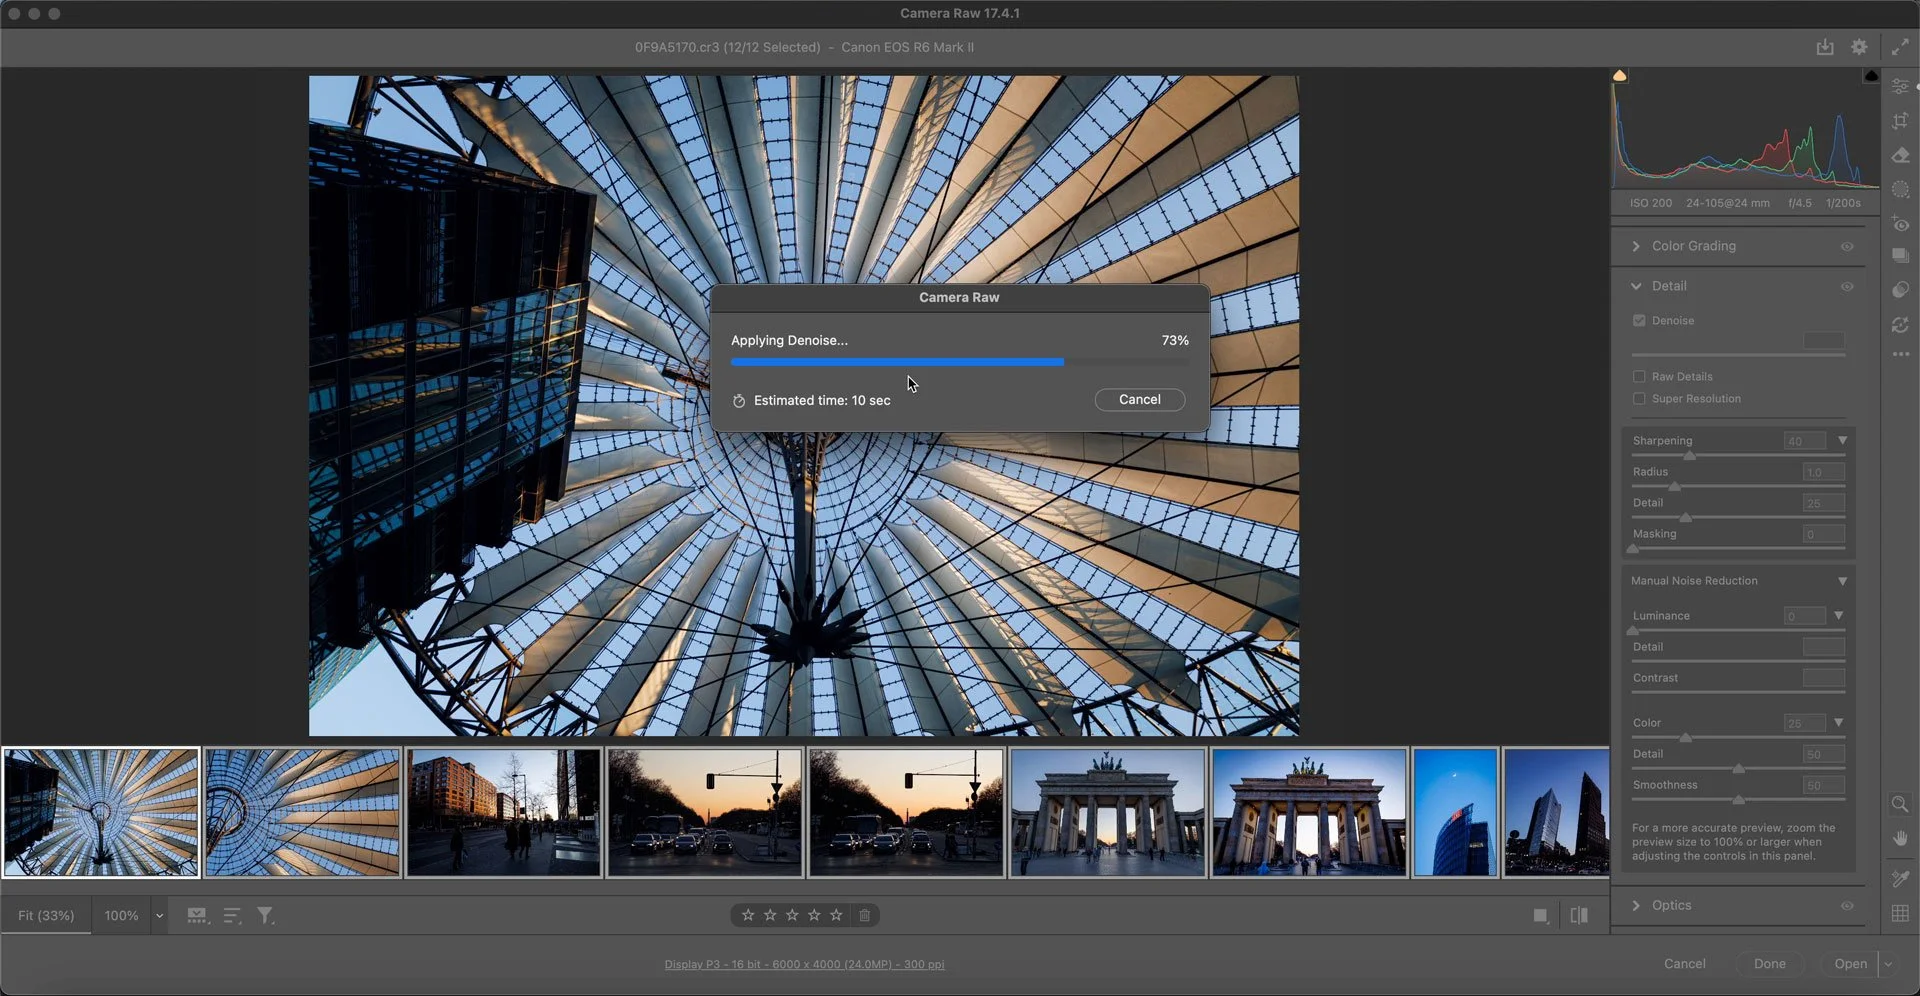
This will open your phots in Camera RAW (or at least it should). Now press command + A (or Ctrl + A on a PC) to select all the images on the camera RAW filmstrip.
Step 4
With all of your images selected, go to the detail panel in the adjustments section and turn on Denoise (or RAW details or Super Resolution). This will start updating the images and then start updating the AI.
Step 5
While Camera RAW is processing, you can switch back to Lightroom and continue working. Just make sure it’s not with the images currently processing.
Step 6
When Camera RAW is finished processing, click on “Done” on the bottom of the interface. Do not click on Open, as this will attempt to open all of your images in Photoshop.
Step 7
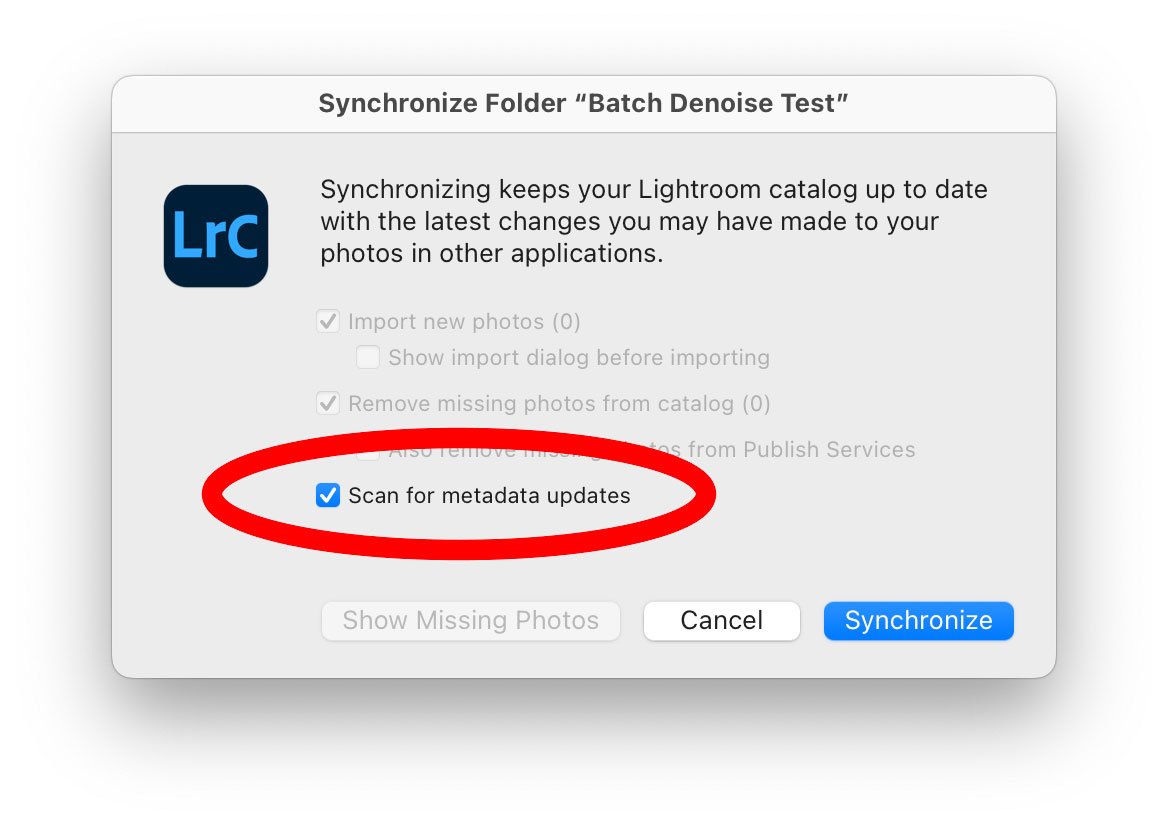
Switch back to Lightroom, and locate the folder containing the images you sent to Photoshop, in the folders panel. Right-click on the folder and choose “Synchronise Folder”.
Step 8
When the dialog appears, make sure the option to scan for metadata is selected and choose “Synchronise”. This should update your images and enable denoise. The AI should not have to recalculate, and denoise should be applied.
Conclusion
This isn’t a perfect process, and it still involves a bit of setup and working outside the box, but it does seem to work. I haven’t tried this on hundreds or thousands of images, so there may well be a limit, but during my initial testing it seems to work. You could theoretically get another computer to do this, by manually loading the images into camera raw using bridge on another computer, but for a quick way to do it, this seems to be at least a temporary answer.