
Another Way to Avoid Clarity Halos in Lightroom. Well, Sort of.
If there’s one thing that really annoys me more than anything else about Lightroom, it’s the halo effect you get when you use the clarity slider. If you haven’t noticed this before, I apologise in advance for pointing it out to you, because once you see it, you can’t unseen it. Once I figured out what it was I see it everywhere online. I’ve been on a quest to find away around it, and I’ve already posted a video about this before. Now I’ve come up with another potential solution to the problem. Or at least a partial solution.
In my previous video on this I showed you how to use the AI masks to stop the haloing problem if there was an object against a plain background like a sky. In fairness, this is where you notice it most of the time. However, there are other situations where this may not work. When working on some recent images of a lake at sunset this problem reared its annoying head again, only this time the “masking out the sky” trick wouldn’t work so I needed to come up with another solution. So this time I tried using a luminance mask. It seemed to work.
Because it’s the darker areas of the image that are being affected, using the luminance mask option to key them out seems to work reasonably well. This isn’t going to work on all images and you will need to adjust it on an image by image basis, but it may offer a solution if you find the clarity halos annoying.
Here’s an example.
Here’s the overall image.
Original Image with no Clarity added
If I add normal clarity, you get clarity halos around the dark parts of the horizon like this: (exaggerated so you can see it clearly)

Normal Clarity Slider
With the luminance mask you get a result like this:

When using a Luminance Mask
The final image with the masked clarity applied:
Image with masked Clarity
Compared to the image with regular clarity:
Image with Regular Clarity (Turned up full to exaggerate the effect)
Is it ideal? No. In this case you can probably just mask the water, but I kind of want some clarity in the sky too. It’s obviously not the same as applying clarity normally but it still works. Sort of!
Here’s how to do this:
- In the develop module, with your image selected, go to the Masks panel
- Click on the range option and select Luminance Range
- Drag the left most triangle on the range slider to about 50% and then drag the softness handle up so that the Luminance range looks something like the screenshot below.
- Now you can add clarity and it should only affect the brighter pats of the image. You may need to adjust the sliders to tweak the results.
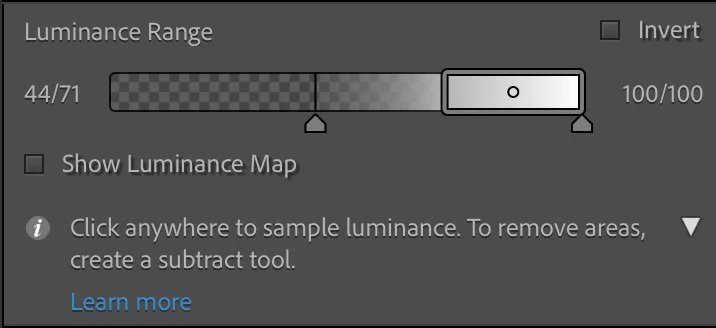
Example of Luminance range used to mask the clarity
Unfortunately, like I said, this doesn’t always work. Sometimes you’ll need to do the reverse, and you need a luminance mask like this (although this can give unpleasant results):
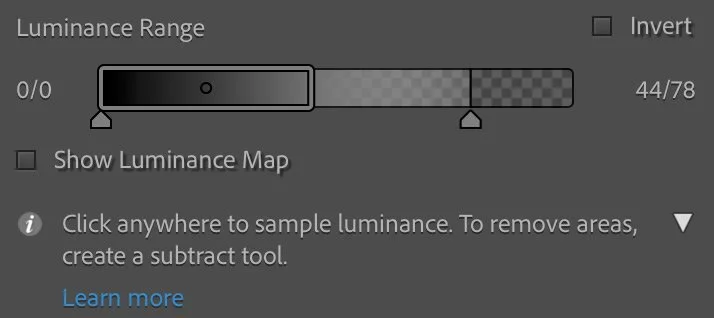
Reversed version for when you need to mask out the brighter areas. This can give unpleasant results though.
Obviously, there will come a point where it’s not even worth it, in which case you’ll need to manually mask areas in. But try it and see how you get on. You can also limit this to areas of your image by using the intersect function to combine it with a linear gradient, for example.
Once you have this set up, you can save it as a preset (or series of presets) and then apply them to your images when needed. You can also then use the amount slider to ramp it up or down when you apply the preset.
I know this isn’t a brilliant solution, and you’re probably asking why I’m even posting this? I just wanted to give you more options and a different way of processing your image should you come up against a difficult situation that needs addressing. Even if it’s not perfect, knowing how to do this might help you when thinking about other problems. That’s the theory anyway!
In an ideal world, Adobe would fix this as it’s incredibly annoying once you spot it. Capture One, for example, doesn’t have this problem with clarity. Lightroom is not using the best algorithm for this, but given Adobe’s reluctance to change things, I doubt that this gets fixed any time soon. If ever. If it bothers you, though, send them feedback on it.