
How to batch process Denoise in Lightroom 14.4
The recent release of Lightroom Classic 14.4 brought with it a major change to how denoise, raw details and super resolution work, and with that, some confusion. One of the most recurring questions I received since publishing a video on the new version last week was “how do you batch process Denoise in the new version?”. It’s pretty straightforward, and there’s actually several ways of doing it.
A few important Notes
There are a couple of things that you should be aware of regarding how Lightroom handles Denoise, Raw details and Super Resolution in the new version of Lightroom. There’s also one important interface element you need to be aware of to avoid possibly not having your settings applied properly.
Firstly, in the old version, Lightroom would bake the changes you made at the pixel level into a new file. This couldn’t be undone, bar deleting the DNG and starting again. The new method no longer does this. There appears to be some confusion around this. When it calculates, it’s computing the AI settings and storing those settings. It’s not creating a hidden DNG somewhere (well, for Denoise and Raw Details, I’m not sure about Super Resolution). If you turn off the setting, Lightroom keeps the AI calculation for a short period but will eventually purge it, and you will have to calculate again.
Secondly, in the Develop module there is an icon on the toolbar (or whatever the official name is) along the top of the Adjustments panel under the Histogram. This is the last icon on the right, and it shows if AI settings are applied. If this turns yellow, it means that the AI settings need updating. This applies to any feature of Lightroom that uses AI, including masks and generative erase. This menu will show you what has been applied, and also tell you if anything requires updating. Simply choose update to update any setting that needs to be updated.

Method 1 - Sync Settings
The simplest way to batch process Denoise (or Raw Details or Super Resolution) in Lightroom Classic 14.4 is to set the parameters in one image and then sync them to the rest of your images. You can do this in the develop module. Here’s what to do:
- Select an image to work with and go to the develop module
- Set the Denoise (or Raw details or Super Resolution) settings in the Detail Panel.
- Using the shift key, select all the images you want to apply this setting to in the filmstrip at the bottom of the develop module. Make sure the image you worked on is “most selected” (it has a stronger white outline)
- At the bottom of the Adjustments panel in Develop Module, Click on the sync button
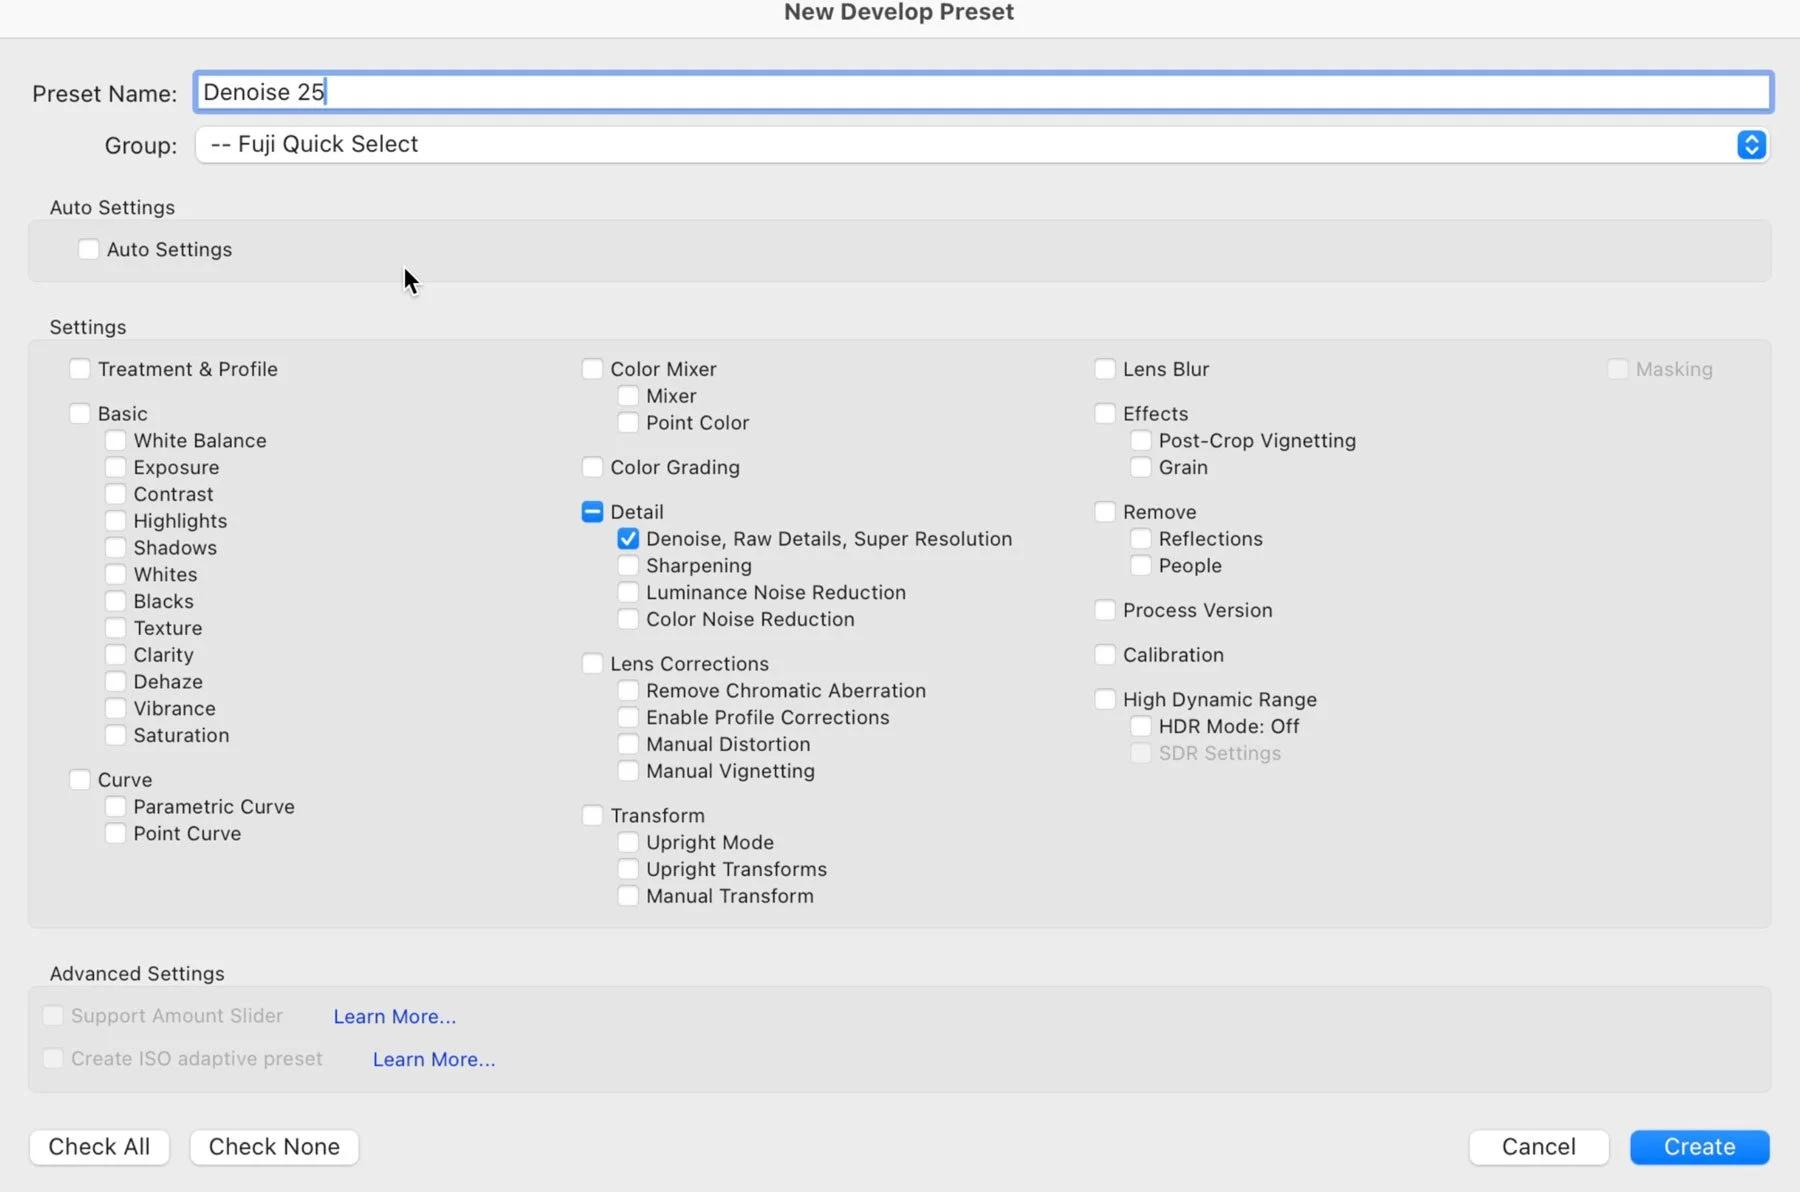
- When the dialog opens, deselect all and only select the Detail settings of “Denoise, Raw Details, Super Resolution” (See screenshot below)
- Click Synchronise
- Lightroom will now apply the settings to the selected images, and as it does so it should start updating the AI settings. Depending on how many images you applied to, this may take some time.
- Your images should now have the AI settings applied and updated.

Method 2 - Use A Preset
The second way you can batch apply Denoise settings (or Raw Details or Super Resolution) is to save the required settings as a Preset and then apply that preset to multiple images. Here’s what to do:
- In the develop module, set the Denoise (or other AI settings in the detail panel) that you want to save and create a preset. Make sure to uncheck any other settings and only check the Detail settings of “Denoise, Raw Details, Super Resolution”.
- Once you have created a preset, go back to the Library module.
- Select the images you wish to apply the preset to
- In the quick develop panel, under saved preset, select the preset you just created.
- This should apply the settings to all the images selected, and it should begin updating the AI settings. Again, this may take some time.
One of the advantages of this method, is that if you have different settings that you regularly use, you can create multiple presets and then quick elect them when you need them. You could also create an ISO Adaptive preset to have Denoise apply different settings dependent on the ISO, but I haven’t tried this yet.
Method 3 - Apply on Import
The last method is a variation on method two, but as it works slightly differently, it needs to be covered separately.
Assuming you have already created some presets, you can apply them on import by selecting the preset in the “Apply During Import” setting in the import dialog box. There’s an important caveat to this, though. It will apply the settings, but it won’t update the AI settings. So, for example, if you have set a preset to apply Denoise, the setting will be set on the interface, but it won’t have updated the AI calculations, so it won’t actually be applied to the image. If you go into the develop module, you will see the AI indicator is yellow, indicating that the settings need to be updated. You can do it here on one image, by choosing the option to update the AI settings from the AI pop-up menu, but you can also batch update.
To batch update the AI settings, go to the Library module, and select all the images you want to update. From the menu, choose: Photo > Develop Settings > Update AI settings.
This should now start updating the AI settings.
Conclusion
If you had built workflows around the old “Enhance” method, I can understand that the new way of working is a bit frustrating, but in my opinion, the positives outweigh the negatives. It will take a bit of time to get used to, but this is the way it will be from now on, and I don’t see Adobe reintroducing the old workflow. Once you get used to it, it really isn’t that different, and you have the big advantage of not having to create separate files. It’s a big boon for Fujifilm users who used RAW details to improve demosaicing. Now you don’t have to create separate DNG files for your images, saving lots of disk space. You can now, also change the settings at any time without having to create a new DNG file just to adjust the Denoise amount. Anyway, if you still have any questions, be sure to leave them in the comments below, and I’ll answer if I can.