
DXO Releases Nik Collection 9. A first look review of the new suite.
DXO has just released the latest version of their venerable photography plug-in suite. Nik Collection 9 adds a whole host of new features, including some across-the-suite changes and some new filters within the individual applications. There are some very useful new changes, including AI and depth masking, as well as blend modes in some of the applications. I had access to the beta version for a few days, and here is my first look at the new suite. There is actually quite a lot going on in this, so I’ll do my best to cover everything, but I may have missed a few things.
New Masking Tools
There are a couple of changes that affect multiple applications in the suite. The biggest of these are the new masking tools. You now have two new masking options, in addition to the U-point masking that you are familiar with. These are: AI selection and depth masking.
AI Selection
Using the AI selection tools from DXO’s own PhotoLab application, the new AI masking tool allows you to use AI to select subjects and objects within your scene. You can use this anywhere you can have local selections, and you have two options. The first is to cover the area with a brush and have the AI detect the object underneath. The second is to use a marquee to draw out a box, and have it select the object contained within. Of the two, I found the second one to be easier to use. You do get an onscreen icon to indicate the selection, and you can actually move it once the selection is made to have it reselect.
AI Selection in SilverEfex
There are some kinks that still need to be worked out in this, especially when it comes to combining masks. For example, in Silver Efex I was trying to apply a “ClearView” effect to the image of yours truly, but mask out my face. The AI mask wouldn’t select my glasses, and try as I might, I couldn’t combine the two masks and invert them to mask out everything but my head. When I added a second mask for my glasses and inverted that, then the rest of my face would be back in the ClearView effect. I couldn’t figure out a way to combine the two masks and invert them both. So this needs a bit of work. You really need the ability to combine masks in a group and then invert the whole group, especially when the AI detection doesn’t get everything in one pass.
AI Mask in Viveza
Even so, it’s a really useful addition. In another demo, for one of the new filters in Analog Efex, I was able to use the AI masking perfectly, but more on that in a moment below. For the most part, this works well, so long as you can create your selection in one go, and don’t need to combine multiple masks. If you do, then it depends on the image and it depends on the filter.
Depth Masking
Another addition to the local adjustment toolbox is the arrival of depth masking. This allows you to add a mask based on the depth of a scene, and once again it uses AI to create a depth map for the image. In my testing so far, this has worked extremely well.
Depth Map in ColorEfex
To activate it, you select Depth Masking from the Local Adjustment selection and then click on the image. You get two sets of controls: there’s an onscreen control and a set of parameters in the adjustments side panel. The latter gives you more granular control over the mask, and you can adjust the feathering of the near and far points. If you have used the Lens Blur tool in Lightroom, then the controls are very much the same.
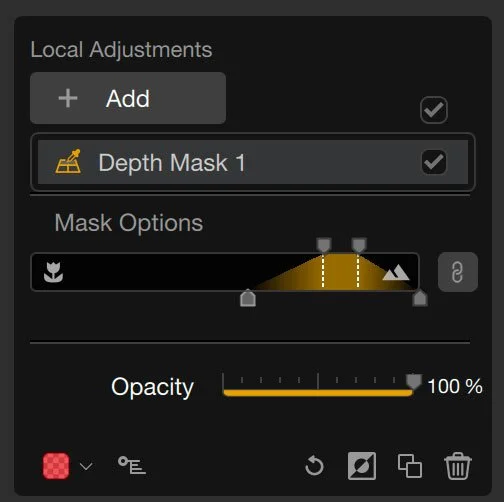
Depth Map Controls
You can also adjust it with the onscreen controls by dragging it up and down to move through the depth of the image, although if you have previously adjusted the feathering in the side panel, this gets reset as soon as you start dragging. I’m not sure if that’s a bug or not, but maybe one for DXO to look at in the future as it’s a bit of a pain right now.
Additional Masking Tools
There are also some additional workflow enhancements to the masking tools. The new “Local Adjustments” palette consolidates all the masking tools under one section to make them easier to find. You can now see the mask as a black-and-white image in addition to the overlay. And local adjustments can now be copied and pasted between filters.
Blend Modes
Another big change that affects multiple applications in the suite is blending modes. Filters in both Colour Efex and Analog Efex can now have blending modes applied to them. This is basically the same as the blending mode options in Photoshop and it opens up a huge new way to vary the effects within these apps.
It works really well with things like the paper textures and light effects in Analogue Efex and can give you dramatically different results with the various filters in Colour Efex.
In the example below, I added a light leak to the image and changed its blending mode from the standard “Screen X2” to “Soft Light” and reduced the opacity. You can see the default version and the one using a different blend mode below.
Light Leak using the default blend mode
Light Leak using “Overlay” Blend Mode
New Filters and Effects
There are also a bunch of new filters throughout the various applications. Here’s a quick overview and some impressions of using them:
Colour Grading in Color Efex
Color Efex gains a new colour grading tool. This is interesting because they didn't just copy a standard three-way colour corrector out of your typical editing application. Instead, it’s a unique take on this tool, by using a single colour wheel. You get a single wheel with points for shadows, mid-tones, and highlights, and an additional one for overall.
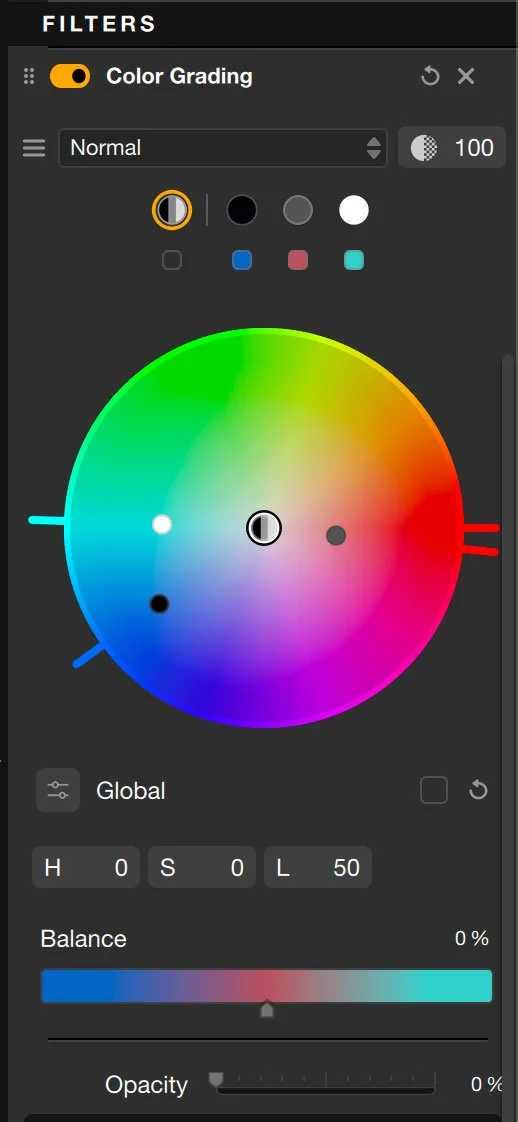
Colour Grading Controls
You click on one of these points and can then adjust the individual control by dragging the point or using the controls underneath the colour wheel. It looks a bit odd at first, but once you get used to it, it works quite well and is actually pretty intuitive.
Chromatic Shift in Analog Efex
This is quite a stylised filter, but you can actually produce some really nice effects with it. It allows you to separate, what would be the print passes of the image and move them. In other words, if you were printing this in a proper printing press with a CMYK colour pass, it allows you to act as if you shifted one of the passes. It’s one of those things that you could see using to make a poster or album cover or something like that.
Chromatic Shift in Analog Efex
You can select pairs of colour channels to move: Red/Cyan, Green/Magenta and Blue/Yellow. Unfortunately you can only do one at a time, and can’t combine these, without rendering out and going back in, but it’s a nice effect. I can see this being useful, especially if you’re a designer. Combine this with blend modes and you can create interesting effects.
Example of a use case I just threw together !
Halation in Color Efex
The idea behind Halation is to recreate the glow you would see on older film stocks, especially around lights and highlights, and other bright areas of a scene. That’s the idea anyway, but you can also create “bloom” type glows around bright sources with this too. It’s a cool tool, and having played around with it for a while, you can create some interesting effects with it. I’m not sure how accurate it is, mind you. I have used other Halation tools, especially in video applications, and this gives a different look than they generally do. There are, however, a good few options, so you can control it quite a bit.
Halation effect in Color Efex
The only issue I have with this tool is that I would have thought that this was better suited to AnalogEfex rather than ColorEfex. As I was going through the suite for this review, I actually thought it was in AnalogEfex multiple times and kept opening that instead of ColorEfex when I wanted to use it. It just seems odd that they wouldn’t put such a specific tool aimed at recreating an analogue film effect in the software specifically designed for analogue film effects. It’s not that big a deal, it just seems odd.
Glass Effect in Analog Efex
Finally (unless I’m missing something), there’s the new Glass Effect. You can find this in AnalogEfex, and it mimics the effect of shooting through textured glass. It’s a nice effect, and you may be thinking: “It’s nice and all, but how often would I need something like this?”. Funnily enough, a few years ago, I was working on a project, and the director was looking for this exact effect on something. Now it was video, so this wouldn’t have worked anyway, but it does come up. (I ended up doing it with displacement masks and a bunch of other effects in After Effects.)
Glass effect in AnalogEfex
It actually renders quite nicely, and you have control over the texture and the scale of the glass effect. There are onscreen controls too, and you can use both blending modes and masks with this for added effect. In this example, I used an AI mask to cut out the deer and had the effect just on the grass.
If I had one suggestion for this, it would be to give users the ability to add their own texture maps in addition to the included ones. This would be quite useful, especially if you or your client had specific needs.
Conclusion and Additional Thoughts
This is quite a solid release from DXO, and I think Nik 9 is definitely one of the bigger Nik releases recently. The masking tools and blending modes alone are worth the upgrade in my opinion. I do have a couple of gripes after using the beta, though.
First of all, for some reason, Silver Efex seems to be running quite slowly. It takes a few seconds to update after moving sliders, and it makes it very hard to edit with it. Now, it could be just a beta bug. There are some optimisation options in the software, and it did improve after changing these to use adaptive resolution and to force it to use the GPU, but there is definitely an issue here. I noticed the same problem with PhotoLab 9, so I hope this isn’t a trend. I’m currently using an M1 Max, Mac Studio. It’s not the newest, but it's hardly a slouch either.
My other gripe is that some of the tools seem oddly placed in certain applications. For example, I would have thought that Halation should be in Analog Efex and I would have thought that the Glass effect would be better placed in the Color Efex.
I also think they need a better way to combine masks. Especially as the AI masking tools will often miss something or add something that you don’t want, and there’s no way to control or edit these. In Lightroom, for example, you can always subtract another mask, so if something is included that shouldn’t be, you can just add a brush and remove it. The masking tools here are a step in the right direction, and the AI selection will save hours for sure, but it needs the ability to combine masks or at least edit the AI mask.
Gripes aside, and they are just gripes (except for Silver Efex, that’s a problem), I do really like some of the new tools. I especially like the Halation effect and the chromatic shift. I can actually think of uses for both of these. If you’re a designer as well as a photographer, these are definitely useful tools to have.
Availability and Pricing
Nik Collection 9 is available now from the DXO website. Pricing for the collection is as follows:
New License: $179.99 | €169.99 | £149.99
Upgrades (From Nik 7 or 8): $99.99 | €89.99 | £79.99
There should be a trial version available too from the website.
You can use my code: ThomasFitzgerald15 to get 15% off (new customers only, I’m afraid)
Note, as this is an affiliate program, we do get a small commission on sales made with this code, which helps run this website.