
If you prefer the old DNG based Lightroom Enhance to the 14.4 method, then here are two possible solutions.
I know I’ve been covering the topic of the changes Adobe made to the old “enhance” workflow a lot lately, but there seems to be quite a bit of questions and confusion around the topic. When I first made a video about it, I knew some people would have an issue with the way Lightroom now works, but I wasn’t really expecting such a backlash. On hindsight, I probably should have, but anyway. As some people really still want to be able to batch process Denoise or Raw Details in their images to a DNG, there are really only two solutions that I can think of.
Solution 1: Downgrade (or Don’t Upgrade)
Adobe will not be bringing the old method of using its AI pre-processors back any time soon, so unfortunately if you want the old way back, your only choice is to downgrade to Lightroom Classic 14.3 and then never upgrade. Obviously, this is a terrible solution, and it’s not an easy process, so I’m strongly not recommending it - but if you absolutely can’t find a way to make the new way work for you, then this is perhaps at least a temporary solution to your problem.
A word of warning - this process may not work if you don’t have a backup of your catalogue from before the 14.4 update. I strongly advise against doing his unless you feel like it is a last resort, and you have no choice. I have not tested this, so I don’t know if the catalogue will load in the older version. You have been warned.
To downgrade, first back up everything - your catalogue and all its associated files and then uninstall Lightroom. Make sure your images have associated XMP files so you don’t lose any edits if you have issues with your catalogue.
Next, go to the Adobe Creative Cloud application and locate Lightroom Classic. Don’t click install, but instead click on the three dots at the bottom left of the panel to bring up the pop-up menu. From here select “Other Versions”.

Click here and select “Other Versions”
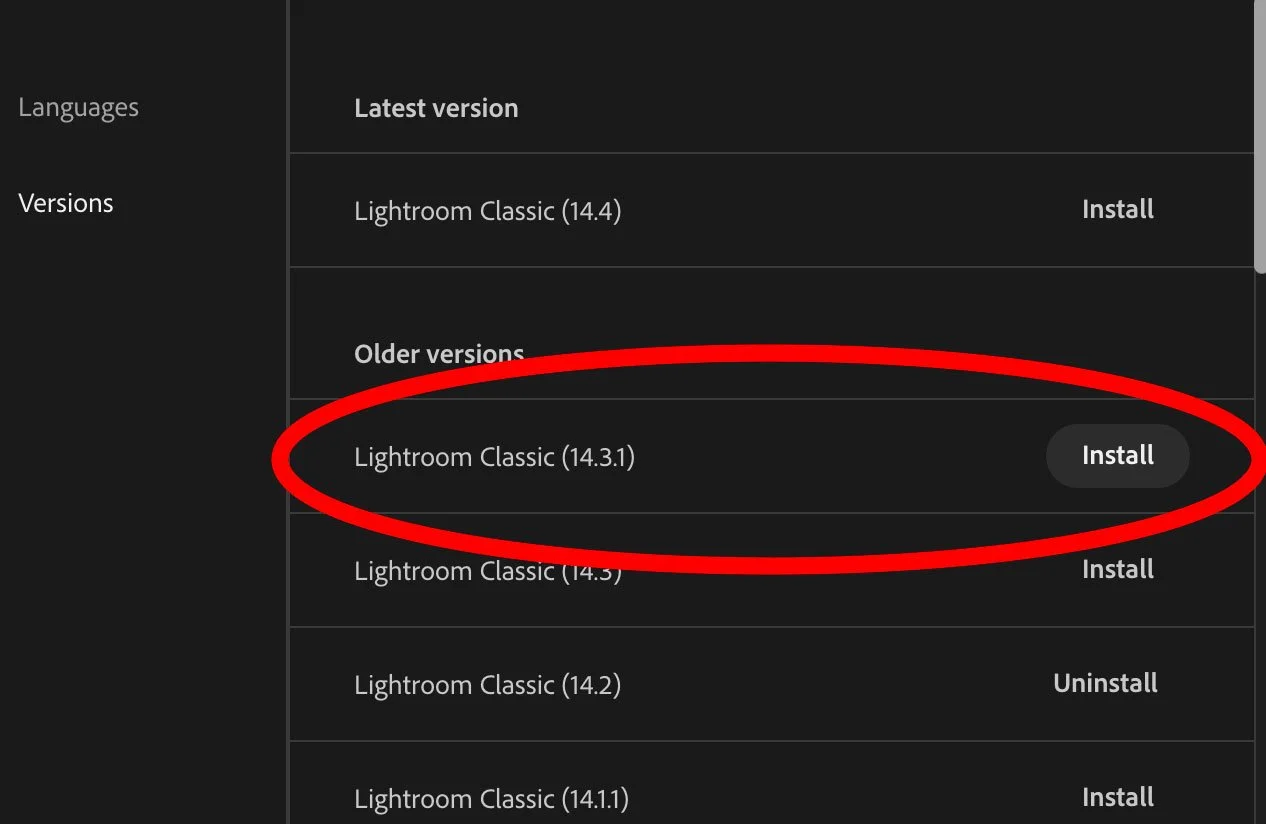
Then, click the “install” button next to 14.3.1. After you install the older version, you may have trouble opening your current catalogue if you upgraded it. If your catalogue won’t open, or gives you errors, you can either restore from a previous backup or if that doesn’t work, you can try creating a new catalogue and importing the old one - although that may not work either. If this doesn’t work, and you don’t have a backup - then you can either manually re-import your images to a new catalogue and recreate your collection etc, or you can just re-install 14.4 and use your current catalogue.
As I said, this should be a “last resort” option, and you shouldn’t do this unless you feel like you have no choice. As I said, I haven’t tried this personally, and I can’t guarantee it will work.
Option 2 - Use DXO Pure Raw 5
The other option, and possibly the more reasonable one to being stuck with 14.3 forever, is to use DXO Pure Raw. This will pretty much replicate the features of Adobe’s Denoise and Raw Details using DXO’s own algorithms. In some respects, it is capable of better results, although processing can take a bit longer. More importantly though, it will create a DNG just like the old version of Lightroom. Another advantage is that when you batch process with the application, it does so in the background without tying up Lightroom.
If you haven’t heard of DXO Pure RAW before, its basically a RAW pre-processing application that converts RAW files to DNGs using DXO’s RAW engine, and the company’s AI-based noise reduction engine “Deep Prime”. It’s designed to give you DNG files that maintain much of the editiability of a RAW file but, have the demosaicing and noise reduction baked in. So it’s very similar to how Enhance used to work. There’s more to it than that, and I’ve covered it quite a bit here on this blog before.

PureRAW batch Process Window
There’s just one thing to be aware of if you’re going to use PureRAW. If you are using it with images that have already been processed, there can be a problem with photos that have used Lightroom’s AI masking feature. When you re-import the new DNGs you may find the mask has shifted or there is a ghost outline around your images. This is because PureRAW is doing lens corrections using its own algorithms, and it produces slightly different geometry to the way Lightroom does it. However, the masking is still stuck on the version before you sent the image to Pure RAW, and doesn’t know it needs an update.
If this occurs you need to force the mask to update. The quickest way to do this is use the erase tool (turn off Generative erase) in Lightroom and just click anywhere to erase a spot. You can then delete it. This should trigger the AI tool to know it needs updating. You can now update the masks using the new AI status menu (last icon on the tools under the histogram). I have a blog post on this issue and how to fix it here.
You can avoid this problem by making sure that sending your images to PureRAW is the first thing you do. This way you will avoid any AI mask shenanigans.
Now I know this isn’t the ideal solution either, as you have to pay for a new application, but if your workflow relies on creating denoised DNGs this is the only solution I can think of. I tried multiple methods of creating DNGs from the denoised files in Lightroom using its built in DNG export options, but it kept the denoise option as non destructive rather than baking it in. You could export as a Tiff, but you would lose the full editiability of the DNG (highlight recovery, etc).
Conclusion
I actually can’t believe that I’m waiting another post on this. I knew there would be a bit of a backlash against Adobe making the Denoise, raw details etc non destructive, but I wasn’t really expecting the amount of upset and anger about it. I personally still think it’s a better solution in the long run, although perhaps they could have offered both as a way to help people transition. I think they could solve most of the issues if they let the AI calculations happen as a background process.
I’ve been doing my best to present solutions here on the blog, and this is just another one. I’m not trying to endorse any particular workflow over another, as everyone’s needs are different. I appreciate that some people are having difficulty with the new workflow, but the change is done, so I’m trying to be proactive and help people adapt. This post was too, just another attempt to help people find a solution. I know it’s not ideal either but again, just trying to help. So please bear that in mind when you’re angrily emailing me. Don’t shoot the messenger as it were. Peace Out!
Just a quick note. This isn’t a sponsored post, but I am on the DXO affiliate programme, so I get a small commission if you buy through the link above