
4 Places to Adjust Brightness in Capture One Pro
A little while ago I posted a quick tip for Lightroom, where I showed you the way to adjust the brightness of an image using the curves tool. I was using the curves adjustment, as I wanted to make the distinction between a brightness adjustment and an exposure adjustment. In Capture One, if you want to make a brightness adjustment, rather than an exposure change, there are actually 4 different ways that you can do this.
Before I get into it, a quick recap: What is the difference between an exposure and a brightness adjustment? Well, it’s actually a little complicated, and different software uses different algorithms. Basically, and exposure adjustment will change the black and white points to an extent as you change the exposure levels, whereas a brightness adjustment, or a gamma change, will just change the mid point of the brightness curve, and keep the black and while levels the same.
To explain a little better here’s an example of changing the exposure vs changing the brightness.
Adjusting the Exposure
Adjusting the Brightness
In capture One there are 4 ways (at least) that you can change the brightness of an image:
- Using the brightness slider
- Using the Levels Tool
- Using the Curves Tool
- Using the Colour Corrector
The last one may not be a “proper” brightness adjustment, but the results are similar. Lets go through them one by one to get a better idea of what to do.
Brightness Slider
This one is fairly obvious. You can find the brightness slider underneath the contrast slider in the main exposure tab. Drag it to the right to increase brightness, and to the left to decrease brightness.
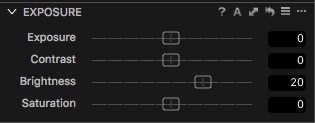
Increase Brightness
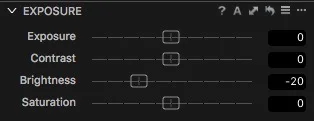
Decrease Brightness
Levels Adjustment
You can find the levels tool on the Exposure tab. It’s usually underneath the High Dynamic Range adjustment depending on your layout. To adjust brightness with the Levels tool, just select the centre point and drag it. This works in the opposite direction to the Brightness slider. In other words drag it to the left to increase brightness and to the right to decrease brightness

Increase Brightness

Decrease Brightness
Curves Adjustment
To adjust brightness using the Curve tool you need to create a point in the centre of the curve and adjust that. Start by creating a point in the exact centre of the curve, where the middle grid lines meet. Drag this point up to increase brightness, or down to decrease brightness. You can use either the RGB or the Luma curve. the results should be broadly similar, although there maybe some slight differences in colour using the Luma vs the RGB curve.
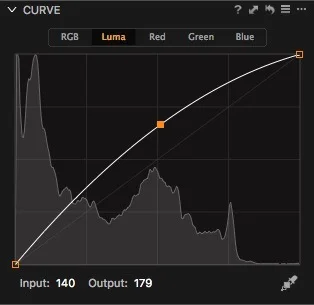
Increase Brightness
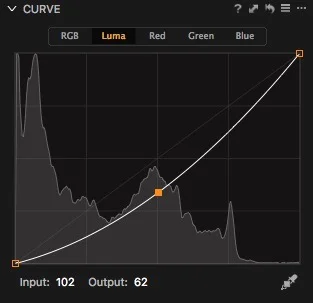
Decrease Brightness
3 Way Colour Corrector
The final way to adjust brightness is to use the 3 way colour corrector on the Colour Tab. If you’ve ever used video grading systems this set of controls should be familiar to you. To adjust brightness, select the midtone controls and using the slider arc on the right of the control group, drag it up to increase brightness, or down to decrease brightness.
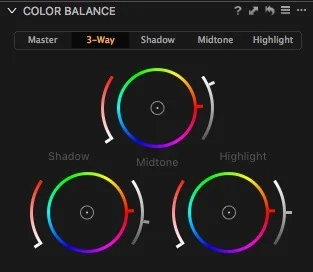
Increase Mid-tone Brightness
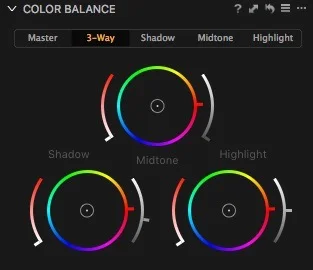
Decrease Mid-tone Brightness
Note that this isn’t a true gamma adjustment as it only affects the centre of the histogram, and it will only adjust brightness a small amount, but it is another way to make fine adjustments if you need to.
Conclusion
This degree of flexibility in how you go about using the software, is one of Capture One’s big selling points. there are many ways you can approach a task, and many different ways to do the same thing. It makes for a very flexible way of working, and it’s one of the reasons that I like the software so much.
Help Support the Blog
If you like this post then you can see more of my work on Instagram, Twitter and Facebook. I also have a YouTube channel that you might like. You should also check out my other Photography Project: The Streets of Dublin. If you want to get regular updates, and notices of occasional special offers, and discounts from my store, then please sign up for the Newsletter.
All of the work I do here, and the information on this blog is done entirely free of charge and takes quite a bit of work. I want to spend more and more time on this blog, and offer more and more of this kind of information, tips and so on. All of this is funded exclusively through my Digital Download store, so If you like what I'm doing here and want to show support, then you can do so by buying something from my Digital Download Store where I have Lightroom Presets, and e-books available for download.
If you're a Fuji X-Trans shooter and Lightroom user, check out my guide to post processing X-Trans files in Lightroom. I also have a guides for processing X-Trans files in Capture One and Iridient Developer.
For Sony Alpha shooters I have a new guide with tips on how to get the best from processing your A6000 Images in Lightroom.