
Why you need to sharpen RAW files
I’ve covered the topic of Raw sharpening on my blog many, many times, but every now and then I still get a snarky comment from a viewer or a reader who doesn’t understand how RAW photos work. It is usually along the lines of telling me that I’d be better off “learning to take pictures properly and get them right in camera so they don’t need to be “sharpened”. The thing is though, the reason you need to care about sharpening RAW files actually has nothing to do with whether you captured your photos properly, or whether images are “sharp” in camera or not. It’s actually to do with the way RAW files work.
When you take a photo on a modern digital camera, that image is captured by the sensor, whose job it is to convert light into digital information. You probably knew that already, right? - but basically, all a sensor does is just measures the amount of light hitting the sensor at each of its individual elements, called photosites. (Photosites are what you think of as “pixels” when you think of the “megapixels” in an image.) What comes off the sensor wouldn’t be recognised as an image as we see it, because all the actual silicon of the sensor does is measure the amount of light.
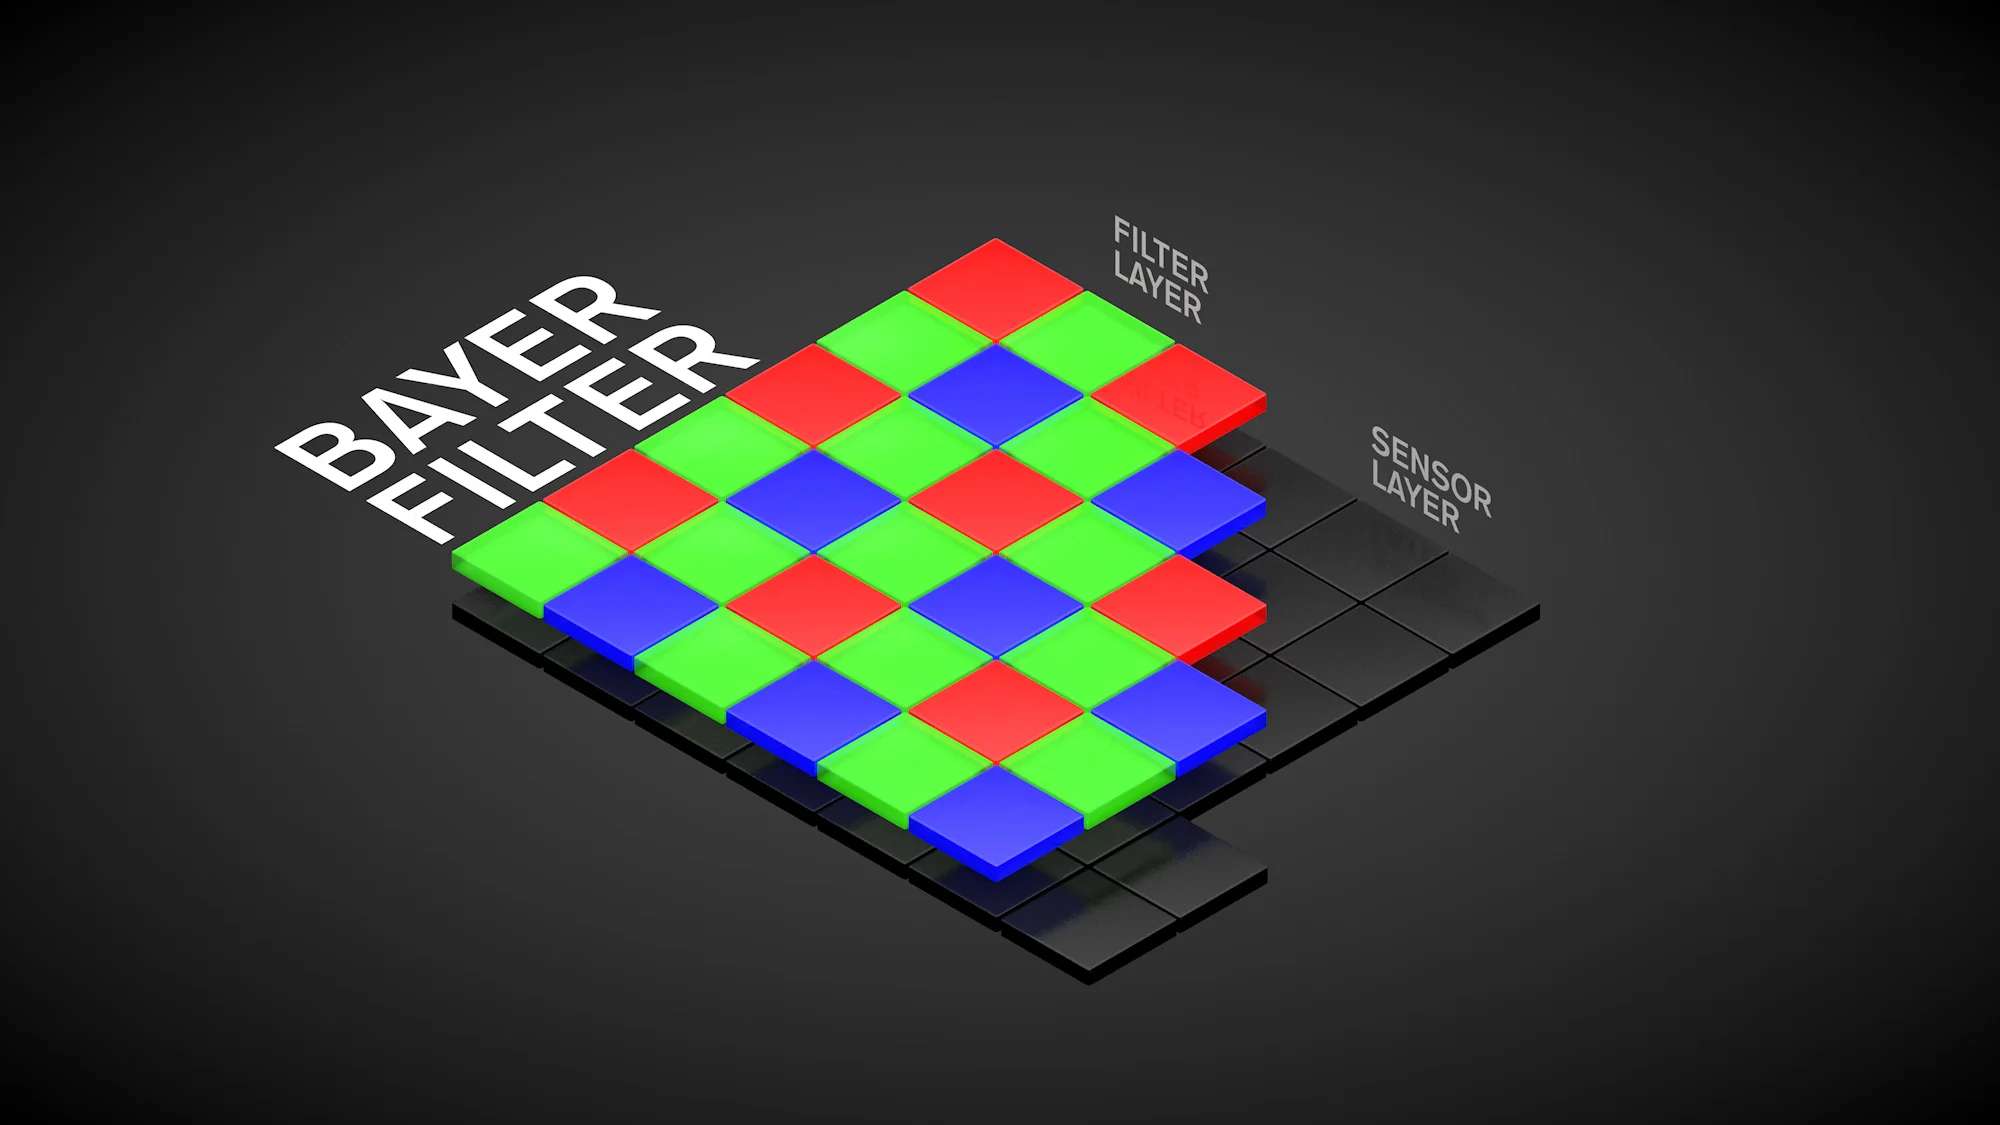
On top of the light sensing layer sits a colour array. Each of the sensor elements is filtered by either a red green or blue filter. The layout of these is either in what is called a “Beyer” array, or if you shoot Fuji, the company’s own “X-Trans” array. This filter, basically only lets light of a particular colour through to the sensor, so for each element, it gets light filtered by a particular colour, but it still only measures the amount of light.
Additionally, some sensors have another layer called a low pass filter, sometimes referred to an anti-aliasing filter. The purpose of this is to prevent moire and aliasing, but many newer cameras, particularly those of higher resolutions are leaving this out.
When you press the shutter button, the sensor measures the amount of light, and then this needs to be converted into usable image data, by combining the information about the amount of light captured, with the already known pattern of the colour array, to create a visible image. The process of conversion introduces some softness into the image, partly due to the anti-aliasing filter if one is present, and also partly because of the way the colour is created from the sensor information. Because each pixel created from a filtered photosite that is either red, green or blue, the actual colour is created by interpolating the information from the surrounding pixels. Think of it like how an inkjet printer works, only in reverse (it’s not exactly the same, but this is a close analogy) Additional filtering, such as noise reduction, chroma blurring and so on, may also be done as part of the conversion process. This too leads to some softening of the image.
When you shoot using your camera’s JPEG option, this processing is done by the cameras on-board processor, and part of that processing includes some sharpening. If you look on your cameras picture controls, they will almost always include some kind of way to adjust the amount of sharpening, usually in a simple plus or minus setting to adjust the amount of sharpening applied. This has nothing to do with capturing a blurry image due to user error, it’s simply to compensate for the inherent softness that comes from the process of assembling the image from the sensor information.
When you shoot RAW, the sensor information is dumped to a file on your memory card, and the reassembly process is done in software rather than the camera's processor. Because it doesn’t have to be done in real-time, it means that you have more options for processing, and that means that different or more complex algorithms can be used for the various parts of the process. Part of that process still includes sharpening, but often the options are greater than in-camera because you have more time and greater processing power. Raw conversion software can use different techniques, but the underlying principle is still the same, and the main reason for sharpening when processing RAW files, regardless as to whether its done in-camera or by software on your computer, is not to correct for user error but to compensate for the softening during the conversion process.

That’s not to say you can’t do additional sharpening if your image is soft due to the lens used, or some mistake on the part of the photographer. Of course, you can, but this should be done in addition to RAW-level sharpening. To make it easier to understand, I will refer to sharpening to compensate for the RAW conversion process as “Raw level sharpening” and additional sharpening as “Post-Raw sharpening”. Some software uses different terminology for this, for example, some people refer to Raw level sharpening as “Input sharpening”.
Different applications approach this differently too. Some applications have a two-stage process for sharpening. They break it down into RAW level sharpening, that is done for the reasons stated above, and an additional sharpening control for soft images due to non-raw conversion issues. Apple’s Aperture uses to do this. Some software applies RAW sharpening automatically but doesn’t give you any control over it, only post RAW sharpening. Apple’s Photos does this, as does On1 Raw. The problem with this approach is that depending on the software, you may not like the default settings, but you have no choice in the matter. Other software, have only a single sharpening control, that you use for both Raw sharpening and post RAW sharpening. This is the approach that Lightroom takes for example.
The thing is, how you sharpen your raw file can actually have a significant impact on the look of the image, and not necessarily just the perceived sharpness. The algorithm used can impact the structure of the file, and too aggressive or too much sharpening can lead to an overly processed or “digital” look. Changing the way a RAW image is sharpened, can alter the appearance of fine detail in the image. For example, in Lightroom, the widely discussed artefacts caused by the unique RAW conversion process with Fuji X-Trans files can be mitigated by changing the sharpening settings (especially the radius) even though the actual sharpness of the image remains relatively the same.
At the end of the day, most people don’t need to know the intricate details of how different sharpening controls and approaches affect the image. Most software has default settings that are, for the most part, fine. However, having a broad understanding of why RAW files need to be sharpened I think is important. In the days of film, most people didn’t know how to process their negatives, but they had a general understanding of the way that negatives were processed using chemicals and then printed onto photographic paper. In the digital world, it's the same. Even if you don’t know every detail of how to process your images, having a broad understanding of the principle is good to have.
Help Support the Blog
I’m now on Patreon. If you like what I do here and find the information useful, then you can help by supporting me on Patreon. As well as helping keep this blog going with even more useful news, tips, tutorials and more, members also get special Patreon only perks. Stop by and check it out.
If you like this post then you can see more of my work on Instagram, Twitter and Facebook. I also have a YouTube channel that you might like. You should also check out my other Photography Project: The Streets of Dublin. If you want to get regular updates, and notices of occasional special offers, and discounts from my store, then please sign up for the Newsletter.
You can also show support by buying something from my from my Digital Download Store where I have Lightroom Presets, and e-books available for download. If you're a Fuji X-Trans shooter and Lightroom user, check out my guide to post processing X-Trans files in Lightroom. I also have a guides for processing X-Trans files in Capture One and Iridient Developer. For Sony Alpha shooters I have a new guide with tips on how to get the best from processing your A6000 Images in Lightroom.