
How to Export using Process Recipes in Capture One
I’ve talked before about importing images into Capture One, and now I want to cover the basics of exporting with Process Recipes. There are two different ways to export your images from Capture One. You can export using the “Export” command, or alternatively, you can “Process” your image with a Process Recipe.
Quick Export using the Export command
If you want to export a file quickly, you can simply go to the File menu and choose Export Image > Export Variants. This will bring up the export dialogue with a list of options for things like file format and so on. This is all pretty straight forward. However, if you want more convenience and you want to export multiple formats simultaneously, then you need to use “Process Recipes”.

What are Process Recipes?
If you’re coming from Lightroom, process recipes are kind of like export presets, but the interface is a little more complicated, and some people can be confused with some of the options, so I will try and explain them as best as I can in the following sections.
When you “Process” your file you’re basically converting from a RAW to a Jpeg, Tiff or another format. To all intents and purposed it is basically a fancy term for “Exporting” You can also batch process with Capture One. The export function is pretty much the same but lacks some of the options. You can also output to multiple “Process Recipes” simultaneously, which is something you can’t do with the normal export function.
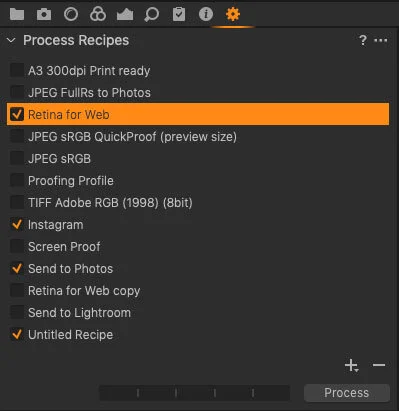
To find process recipes, go to the Output tool tab on the capture one interface. This is usually the last tab, and the icon for it looks like a little cog.
If you have the express version of Capture One, you’re out of luck I’m afraid as it doesn’t have the Process Recipe function, but you can still export as usual.
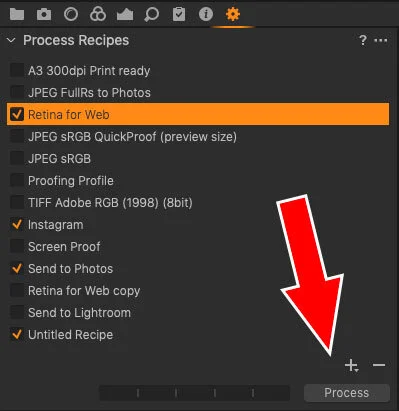
Creating a new recipe
To create a new Process Recipe, go to the Output Tool Tab, and at the bottom of the Process Recipes tool, click on the + button. If you click and hold on the + button, you will get a selection of templates to from which to start. For the purposes of this exercise, just click on the plus to create a new recipe. This should create a recipe called “Untitled Recipe” in the Process Recipes list.
Process Recipe Parameters
There are lots of parameters you can set as part of a Process Recipe. When you create a new recipe, you set its parameters in the “Process Recipe” tool, which you’ll find below the list of recipes. This is broken into a number of tabs. These are as follows:
- Basic: Here, you set things like file format, resolution and so on.
- File: Set options for where the resulting file will go
- Adjustments: Controls whether to respect crop or not, and whether to include sharpening or not
- Metadata: Controls what metadata to include
- Watermark: Add and place a watermark on your image.
Now, let’s go through some of the key options in each of these panels. Most of these are self-explanatory, so I won’t go through everything, but I will cover some of the more important ones.
Basic
Here are the options in the Basic tab and what they do:
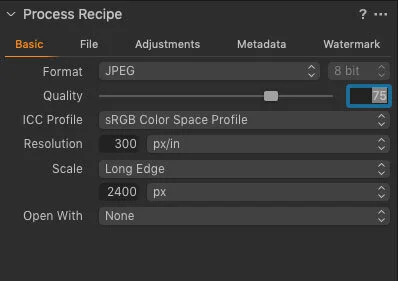
- Format: This lets you select which file format you use. You can elect various versions of Jpeg, Tiff, PSD, PNG and DNG. If you choose DNG, you will create a RAW file with the DNG wrapper. As far as I know, this is not demosaiced, so you can’t use this to create a file like you would with something like Iridient X-Transformer.
- Bit Depth: Beside the format pop-up, is another pop-up for setting bit depth. Here you can choose 8bit or 16 bit depending on the file format.
- Quality: Sets the quality of a Jpeg File.
- ICC Profile: Sets the colour profile of your exported image. If you’re outputting for the web choose sRGB. If you’re sending it on to be further edited, use Adobe RGB or ProPhoto RGB. If you don’t see this option here, select “Show All” from the bottom of the pop-up menu.
- Resolution lets you set the dpi or ppi. Note that this will only affect the pixel dimensions if you set your dimension in inches or cm. If you choose the scale as pixels or percentage, this won’t set your output pixel dimensions.
- Scale: this option does control the output dimensions. Here you can set it to a fixed percentage, or set one of the dimensions, and you will get options to set those dimensions in physical units, such as inches or cm, or pixels. My favourite choice here is “Long Edge” which set the size for the longest edge of your image, and it will scale it to that. I set this to 2400px when outputting for the web because when used on a retina or HDI display, it will be the correct with of 1200px for my website.
- Open With: Lets you choose an application to open the file after it is exported.
File
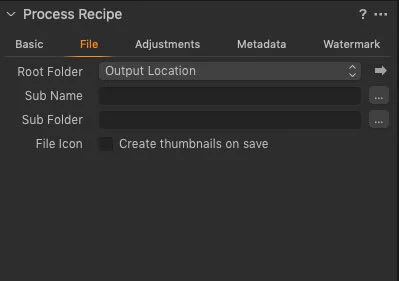
This tab lets you control where the file is output. This tab may be a little confusing to new users, as there is another tool below the Process tool called “Output Location”, which is connected to this, but also different. Let me try and break it down.
The first pop-up here is called Root Folder. This lets you set where your images will be exported to, and you can create subfolders within this. When you go to this pop-up menu you will get a bunch of options - these are:
- Output Location
- Image Folder
- Select Folder…
The Output Location option uses the location you set in the Output Location tool. Think of this as a global variable for setting the output location. Whatever you set in the Output Location tool will be used by any recipe that sets its Root Folder to “Output Location”, but you can also have individual recipes use their own location that is just for that recipe. You select that by choosing “Select Folder”. If you do this, the folder you set will be unique to this recipe and will override whatever is set in the Output Location.
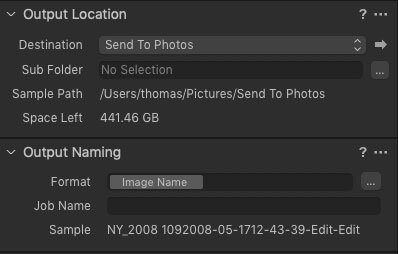
However, if you’re outputting multiple recipes at once, and you want them all to start from the same root folder, then use output location, and set that destination globally.
The other option here, Image folder, will process out the file into the same folder as the original.
The Sub Name option here allows you to set the naming for your outputted files. You can use Capture One’s dynamic tokens here for smart renaming based on metadata. To do this, click on the … button beside the naming field. This will bring up the token options and let you set various options for naming based on metadata. Note that there is also an output naming tool below the output location filed, this behaves similarly. If you use the sub name option in the File tab of the recipe, it will override whatever is in the output naming. Again, think of it this way. Options set in the tab are on a per recipe basis, but options set in the Output Location and Output Naming are global.
The other options here are for Sub Folder, which again, like the others can be used to override the global settings if you choose “Select Folder” rather than output Location.
Finally “File icon” is a tick box that chooses whether or not you output a thumbnail. Leave this off to create a smaller file.
Note that the Capture One user guide goes into this in much more detail, and rather than I try and replicate all that, you can just go here and read the in-depth version! (It's across multiple pages, so follow the links at the bottom to read through all the instructions)
Adjustments Tab
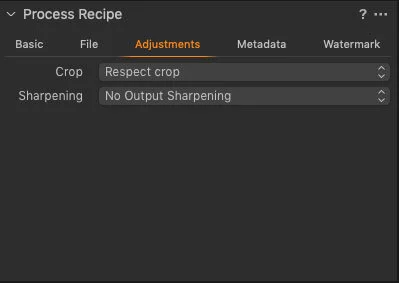
Capture One Process Recipes Adjustments Tab
The Adjustments tab allows you to disable certain adjustments when exporting a file. There are two options here: Crop and Sharpening.
Crop
Under the options for Crop, you can have the exported file either respect the crop you set in the software or ignore the crop. If you’re exporting a photoshop file, you can also set it to output the crop as a photoshop path instead of cropping the image. This can be useful if you’re working with a page layout application and need borders or bleed or something similar, or you’re passing on to another editor, and you don’t want to finalise the crop but give guidance.
Sharpening
There are three options under the sharpening pop-up. Here’s what they do:
- No Output Sharpening: This keeps the current sharpening settings, but doesn’t add any additional sharpening on output.
- Output Sharpening for Screen. This allows you to add some additional sharpening during output. You can use this to compensate for the effects of scaling an image, for example. However, in my experience, the scaling algorithm in Capture One is so good, you don’t need this.
- Output Sharpening for Print: Use this to add additional sharpening optimised for further printing of your image. Use this if you’re planning on printing your image using other software, or by sending to a service provider.
- Disable All: This will disable any sharpening, including creative sharpening that you may have done in your image. Use this if you want to sharpen your image in different software, or if you're going to send it on to another person to edit.
Metadata
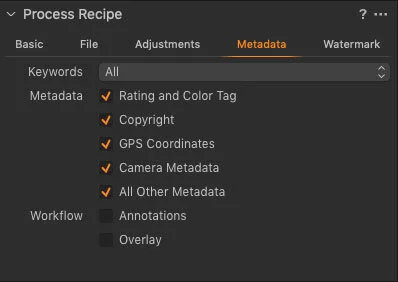
This tab lets you select which metadata you want to include with your exported file.
- The Keywords pop-up lets you elect whether to include all keywords, no keywords, or selected keyword libraries that you may have created in the keyword tool.
- The Metadata switches let you turn on and off selected metadata to be included with your file.
- Workflow enables you to choose additional Capture One specific notes such as the overlay or annotation layers to include with your image. If exporting as Photoshop, the Annotations and overlay layers will be included as separate photoshop layers.
Watermark

The final tab lets you add watermarks to your images. You can add text watermarks or image-based watermarks. If you choose a Text watermark, you will get options for the text you want to use, the font and so on. For image watermarks, you get an area where you can drop an image file to use as a watermark (or you can select it with the File … button)
Both options will also give you controls to scale and position your watermark. You can also interactively move the watermark by using the “Move Watermark” cursor tool. You can select this from the main toolbar or the button on the watermark panel. You can use this to position your watermark interactively on the image.
Selecting and Activating Recipes
Now that we’ve looked at how to create recipes and the parameters they can contain, there are a couple of other important factors about recipes that you should be aware of.
To activate a recipe, you check the tick box beside it in the Recipe list. You can enable multiple recipes at once, and these will all be used when processing. The recipe you have selected (in other words, the one you have highlighted in the list) will be previewed in the viewer. If you have a watermark on the selected recipe, it will show up in the viewer.
You can also use the recipe proofing function to preview selected recipes further. This will preview colour changes, and compression options, however, there are limitations to this. If you have the Scale size set smaller than the viewer window area, recipe proofing will also preview resizing and give you an accurate preview of what the image will look like when exported. I use this function as a way to create a better preview image in Capture One.
You can have recipes selected which are not checked for activation. In other words, you can select and preview a different recipe to the ones that you are exporting.
Processing
Now that you know all the set op and options, how do you actually export using process recipes? It's pretty straight forward. All you have to do is select the images you want to export and click on the Process button. Once you do the photos will start exporting, and you can see them in the queue tab of the Batch tool at the bottom of the Output tool tab
Conclusion
This has been a pretty long blog post, and I’ve only really covered the basics of using the output tools. I didn’t even go into how you use the dynamic tokens to have your exports go into folders based on metadata, and I only briefly touched on process recipes. The Process recipe system is pretty powerful, and I hope this has given you a good overview and enough information to get started.
If you’re not already a Capture One user, you can get your copy now from the Capture One store, and we get a wee commission that helps keep this website going. If you want to try it first, you can download a 30 day trial from the website.
Help Support the Blog
Patreon
If you like what you see here and you find this useful, then you can help support this blog and help me keep making great content like this by supporting me on Patreon for as little as $1 a month. There are a number of options available with different rewards, such as behind the scenes content, special Patreon only videos and more. Check out my Patreon Page for more details, and a big thanks to everyone already supporting this blog on Patreon.
Buy me a coffee!
If you’d rather not use Patreon, but still want to say thanks or help, then you can feed my caffeine habit and buy me a coffee via PayPal with a one off donation to my PayPal tip jar.
Lightroom Presets and Capture One Styles
If you use either of these applications, then check out my range of custom made Looks in the form of presets for Lightroom, and Styles for Capture One.
Join our Facebook Group
If you want to discuss anything you’ve read here on my website, or saw on my youtube channel, or if you want to share images you’ve created using any of my techniques or presets, then I’ve started a new Facebook Group just for that.
Note that this post contains paid affiliate links. We get a small commission for purchases made through these links, which helps run this site.