
More Notes on DXO Pure Raw 2 - Fuji Processing - General Tips
Ever since it came out last week, I’ve been getting lots of questions about Pure Raw 2. I had outlined a first look at the software last week, both here and on my YouTube Channel, and I’ve had lots of comments and queries on various aspects of the application. So, I thought I’d try and address some of the key things people had questions about in this post.
General Tips
Keeping the settings in Lightroom when you send an image for processing
A few people had an issue with this one. You should be able to use the plug-in in Lightroom to send a photo to Pure Raw, and it will keep the develop settings you had applied when you sent it. However for this to work properly, you must have the option to write XMP files automatically turned on, or you must manually save XMP data before sending the file over.
The default behaviour of Lightroom is to automatically write XMP data to files, but many people turn this off because with older versions of Lightroom or older computers it can cause a slowdown.
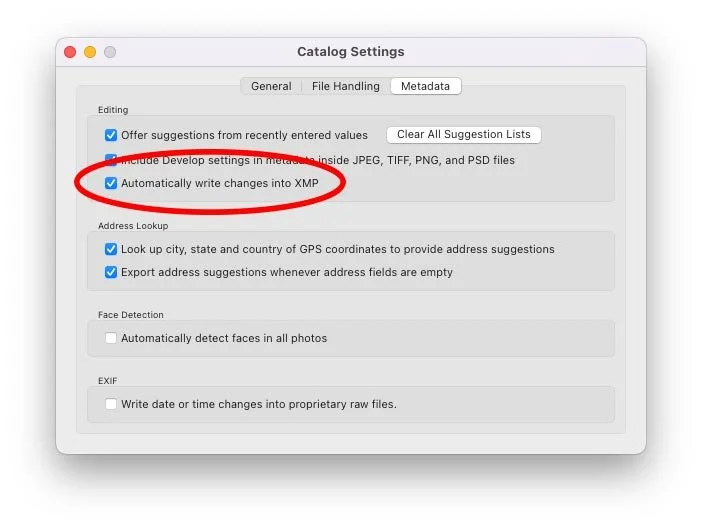
To make sure it is on, go to the Catalogue Settings (It’s not in the preferences, it’s in the catalogue settings) and then go to the metadata tab. Make sure the option to write changes to XMP is turned on.
Note that with a recent version of Lightroom they changed the behaviour of this function. Previously it would update the XMP file every time you changed a slider, but now it only does it when you change images (in order to reduce the load on your computer) - so if you’re in the middle of editing a file and you decide to send the image to Pure Raw, make sure you either switch to the next image and back, or manually save the XMP data before you send the file over.
To manually save the data, it’s Command + S on the Mac or Ctrl + S on the PC. You can also find it in the Photo Menu > Save Metadata to File.
Note that if you have a large library, and this feature was turned off, it may take some time for all the metadata to update to disk when turned back on.
Super Resolution
Someone commented that one of the disadvantages compared to Lightroom’s “Enhance” function is that you can’t use “Super Resolution” - but you can! You can actually use the Enhance function in Lightroom on a Pure Raw processed DNG file to access super resolution, but the quality isn’t as good (in my opinion) as you get with doing this directly from the original RAW file.
Super Resolution - From Pure Raw on the Left and from the RAW file not he right. Pure Raw appears sharper, but looks more processed. (Difficult to tell from the crop)
What about a Plug-in for Capture One
“A plug-in for Capture One” is another commonly asked question that I got after my original posts. I had attended a press briefing for the software before the launch, and this was actually brought up by one of the other journalists in the virtual room.
According to the developers, Capture One’s API currently lacks the functionality they need to be able to implement this in Capture One, so that’s why there is no plug-in currently available for it. They did say that they would like to implement it, and should the API be updated in the future to support the required functionality they would absolutely consider it.
For the moment if you want to use it with Capture One, you need to manually add the files to the stand-alone application, and then re-sync them back to Capture One.
Fuji Processing
Understandably there have been a lot of questions around the Fuji X-Trans processing, particularly about how it compares to other software and so on. I could do a whole post on this on its own, but I thought I’d offer some overall points on how it compares to other Fuji processors in general.
Before I get to that, an important note about Fuji processing:
Use Deep Prime for Fuji Processing
If you’re trying this out on Fuji Files, you need to use the Deep Prime setting. The “Prime” setting doesn’t work with Fuji files, as they use the AI demosiacing in Deep Prime for a proper demosiac of Fuji X-Trans raw files. The HQ mode does work, but it’s atrocious, so son’t use it. The only setting that works properly with Fuji files and gives descent results is Deep Prime
Compared to Other Solutions
So how does the quality compare to the other Fuji Processing options (except Lightroom’s default conversions)? Well, it’s not that straight forward a question, unfortunately, and it’s somewhat subjective.
For the purposes of this, I’m going to lump Lightroom’s Enhance, Capture One and X-Transformer in together in comparison to Pure Raw. I know that there are differences between all of these, but for the sake of comparison here, I think it’s sufficient to compare them as a group.
I can only offer my opinion here, so if you are curious, I strongly suggest you try the trial version on your own images. It’s the best way to judge. However, if you are interested in what I think, then read on…
In terms of pure quality, it really depends on the image, and the lens used. In some cases, the results are great. There is lots of detail and the image is really clean. However in other situations, it looks like it’s been heavily over processed. Sure you get lots of detail, but at close inspection, it’s very over-sharpened and looks artificial and heavily processed. Even with the additional lens sharpening turned off, it seems to still substantially over-sharpen images in some cases. I also find that the noise reduction can obliterate fine textures and leave some flat surface details completely smooth with no texture in them.
If you use DXO Photo Lab, you can actually turn down the noise reduction and the sharpening and get much better results, but there’s no control with Pure Raw other than on or off.
Now the thing is, based on my experience discussing Fuji processing with readers over the years, some people will have no problem with this or even prefer it. It does extract a crazy amount of detail from files (See below), so you may prefer that despite the over-processed look. Personally, I don’t think I would use it as my every-day converter, but instead, use it specifically on high ISO or images that I wanted to get extra details from.
I’m not going to post lots of crops here trying to convince you of my point of view on this, because there’s no point. A small crop on a web page doesn’t get across the point, so as I said earlier, try it for yourself if you’re curious. The best comparisons will be your own images. But here are some crops from the image in the screenshot above.
Pure Raw on the Left vs Lightroom Enhance on the right. Pure Raw version has much more detail, but looks processed and over-sharpened. Click to view larger.
Pure Raw on the Left vs Lightroom Enhance on the right. Pure Raw version has much more detail, but looks processed and over-sharpened. Click to view larger. (Half way between the two would be ideal - but there’s no way to adjust the settings in Pure Raw
Speed and File Size
There are two other issues that my also prevent you from using this as your default converter. The first is the speed. It’s very slow with X-Trans images. Even on a fast computer it can take ages compared to other solutions. At the weekend , I shot a bunch of landscape photos, and thought I’d try to use Pure Raw on all of them, but for 200 photos it was going to take 2 hours. This wasn’t practical so I stopped it. I’m using a M1 MacBook Pro, so not exactly a slouch. Perhaps this is a bug or perhaps there’s still some optimisation that can be done, but currently it’s painfully slow on X-Trans images. Standard Beyer photos are much quicker.
Another problem some people might have is the file size. When you convert a Raw file to a DNG this way you end up with a much larger file. This isn’t anything new, and it’s to do with the way RAW vs Linear DNG files work. I actually covered this years ago because so many people were asking about it when X-Transformer first came out. Here’s what I wrote at the time:
Using X-Transformer to convert to DNG increases the size of the final files a little. This isn’t a fault of the software or bad programming. It’s due to the way raw files work. A Raw file effectively stores the raw data directly off the image sensor. This data doesn’t actually contain individual colour channels. It is just a data representation of the amount of light hitting the sensor at each of the sensors photo sites. Colour is handled by the colour filter which is placed over these. Because the filter is fixed, that information is used in combination with the light data to create the image.
In other words, you have only one channel of data really in a raw file. This is combined with the information about where each colour element is in the colour filter, and when you use these two bits of information, you can reconstruct an image from the data. This is what is happening during the conversion process, and so you go from having one set of data, and the filter layout, to having three individual channels of information (red green and blue) so the file will inevitably be larger. At least, that’s my understanding of how it works.
Ironically, X-Transformer added compression options since I wrote that and the file sizes are smaller now, but that’s the gist of what’s happening.
Summary
That’s about it for now. I’m continuing to test it and will have more thoughts in the future if I come across any more points of interest with Pure Raw 2. If you have any more questions feel free to add them in the comments below, and I’ll do my best to answer.
Help Support the Blog
Check out my Capture One Style Packs
If you’re looking for some Film Effect, or black and White style packs for Capture One, check out my Capture One styles on my Gum Road Store.
Buy me a coffee!
If you’d rather not use Patreon, but still want to say thanks or help, then you can feed my caffeine habit and buy me a coffee via PayPal with a one off donation to my PayPal tip jar.
Join our Facebook Group
If you want to discuss anything you’ve read here on my website, or saw on my youtube channel, or if you want to share images you’ve created using any of my techniques or presets, then I’ve started a new Facebook Group just for that.
Note that this post contains paid affiliate links. We get a small commission for purchases made through these links, which helps run this site.