
How to Extract Detail from an Image and Enhance Texture with DXO PureRAW 4
DXO Pure Raw is a very interesting application. It’s primary purpose is noise reduction, and if you’ve heard of the software, removing noise from an image is probably what you most associate with the software. However, with version 4 they opened up a very interesting alternative use of the application. By allowing you to change the way the algorithm works, you can actually turn the noise reduction down and the detail recovery up, and the result can be a pretty impressive level of detail recovery on the right kind of image. I’ve been trying this a lot recently, and when it works well, I’m really impressed by the results.
A bit of background
If you’re not familiar with PureRAW, it is DXO’s Raw pre-processing application. It basically uses the image processing engine behind DXO Photo Lab to pre-process RAW files into DNG files, in much the same way as software such as Irident Transformer, or even Adobe’s own “Enhance” function in Lightroom.
There are two key technologies at work in Pure Raw. The first is DXO’s DeepPrime AI based noise reduction technology. This applies a machine learning based Denoise during the demosaicing phase of the RAW conversion. The latest version: DeepPrime XD2 adds detail recovery to the noise reduction process.
The second is DXO’s “Optics module” based sharpening and distortion correction. This is based on DXO’s in-house lab profiling camera and lens combinations. Unlike Lightroom, the software compensates for sharpness differences across the lens, meaning if your lens is softer in the edges, the software will apply more sharpening in the edges.
With previous versions of PureRAW, the big limitation was that the noise reduction element of the software, DeepPRIME was basically on all the time at the one setting. The results could be a bit too strong, the result being at times, an un-natural looking image. However in version 4, they added control over this with two sliders. One to control the noise reduction and one to control the detail recovery. So now, if you don’t want the noise reduction you can turn that down, but still use the detail recovery and the sharpening of the optics modules to get improved detail and textures in your image.
Of course this will depend on the source, and it appears to work better with some cameras than others, but below is a guide on the settings I use and what to try if you want to check this out for yourself.
Some Examples
It’s really hard to showcase these on a webpage, as you really need to see the results large on-screen to get the full impact, but here are some comparison 1:1 crops. Click on these to view them larger:
(Note that square space scales these in an odd way and I have no control over this so you may not be able to get the best view of these depending on your screen resolution)
Pure RAW version on the Right
PureRAW version on the left.
Tempering Expectations
Your mileage with this will vary greatly depending on a number of factors. The results seem to depend quite a bit on the type of camera you shot with. The subject matter also seems to make a difference. I’ve noticed that you will get the best results with fine textural detail rather than larger patterns. So broad shapes won’t be impacted that much, but the texture of say, a rusty metal in a scene or the detail in leaves or flowers, can be enhanced quite a bit.
It’s also quite easy to overdo it and create a fake or over-processed looking image. They key is to try it for yourself and you will quickly see what works and what doesn’t work.
How to bring out detail with low ISO Images
For the instructions below, I’m going to assume you’re working with Lightroom, but the process is more or less the same if you’re working with other software. In that case you’ll just have to use the standalone application rather than the plug-in.
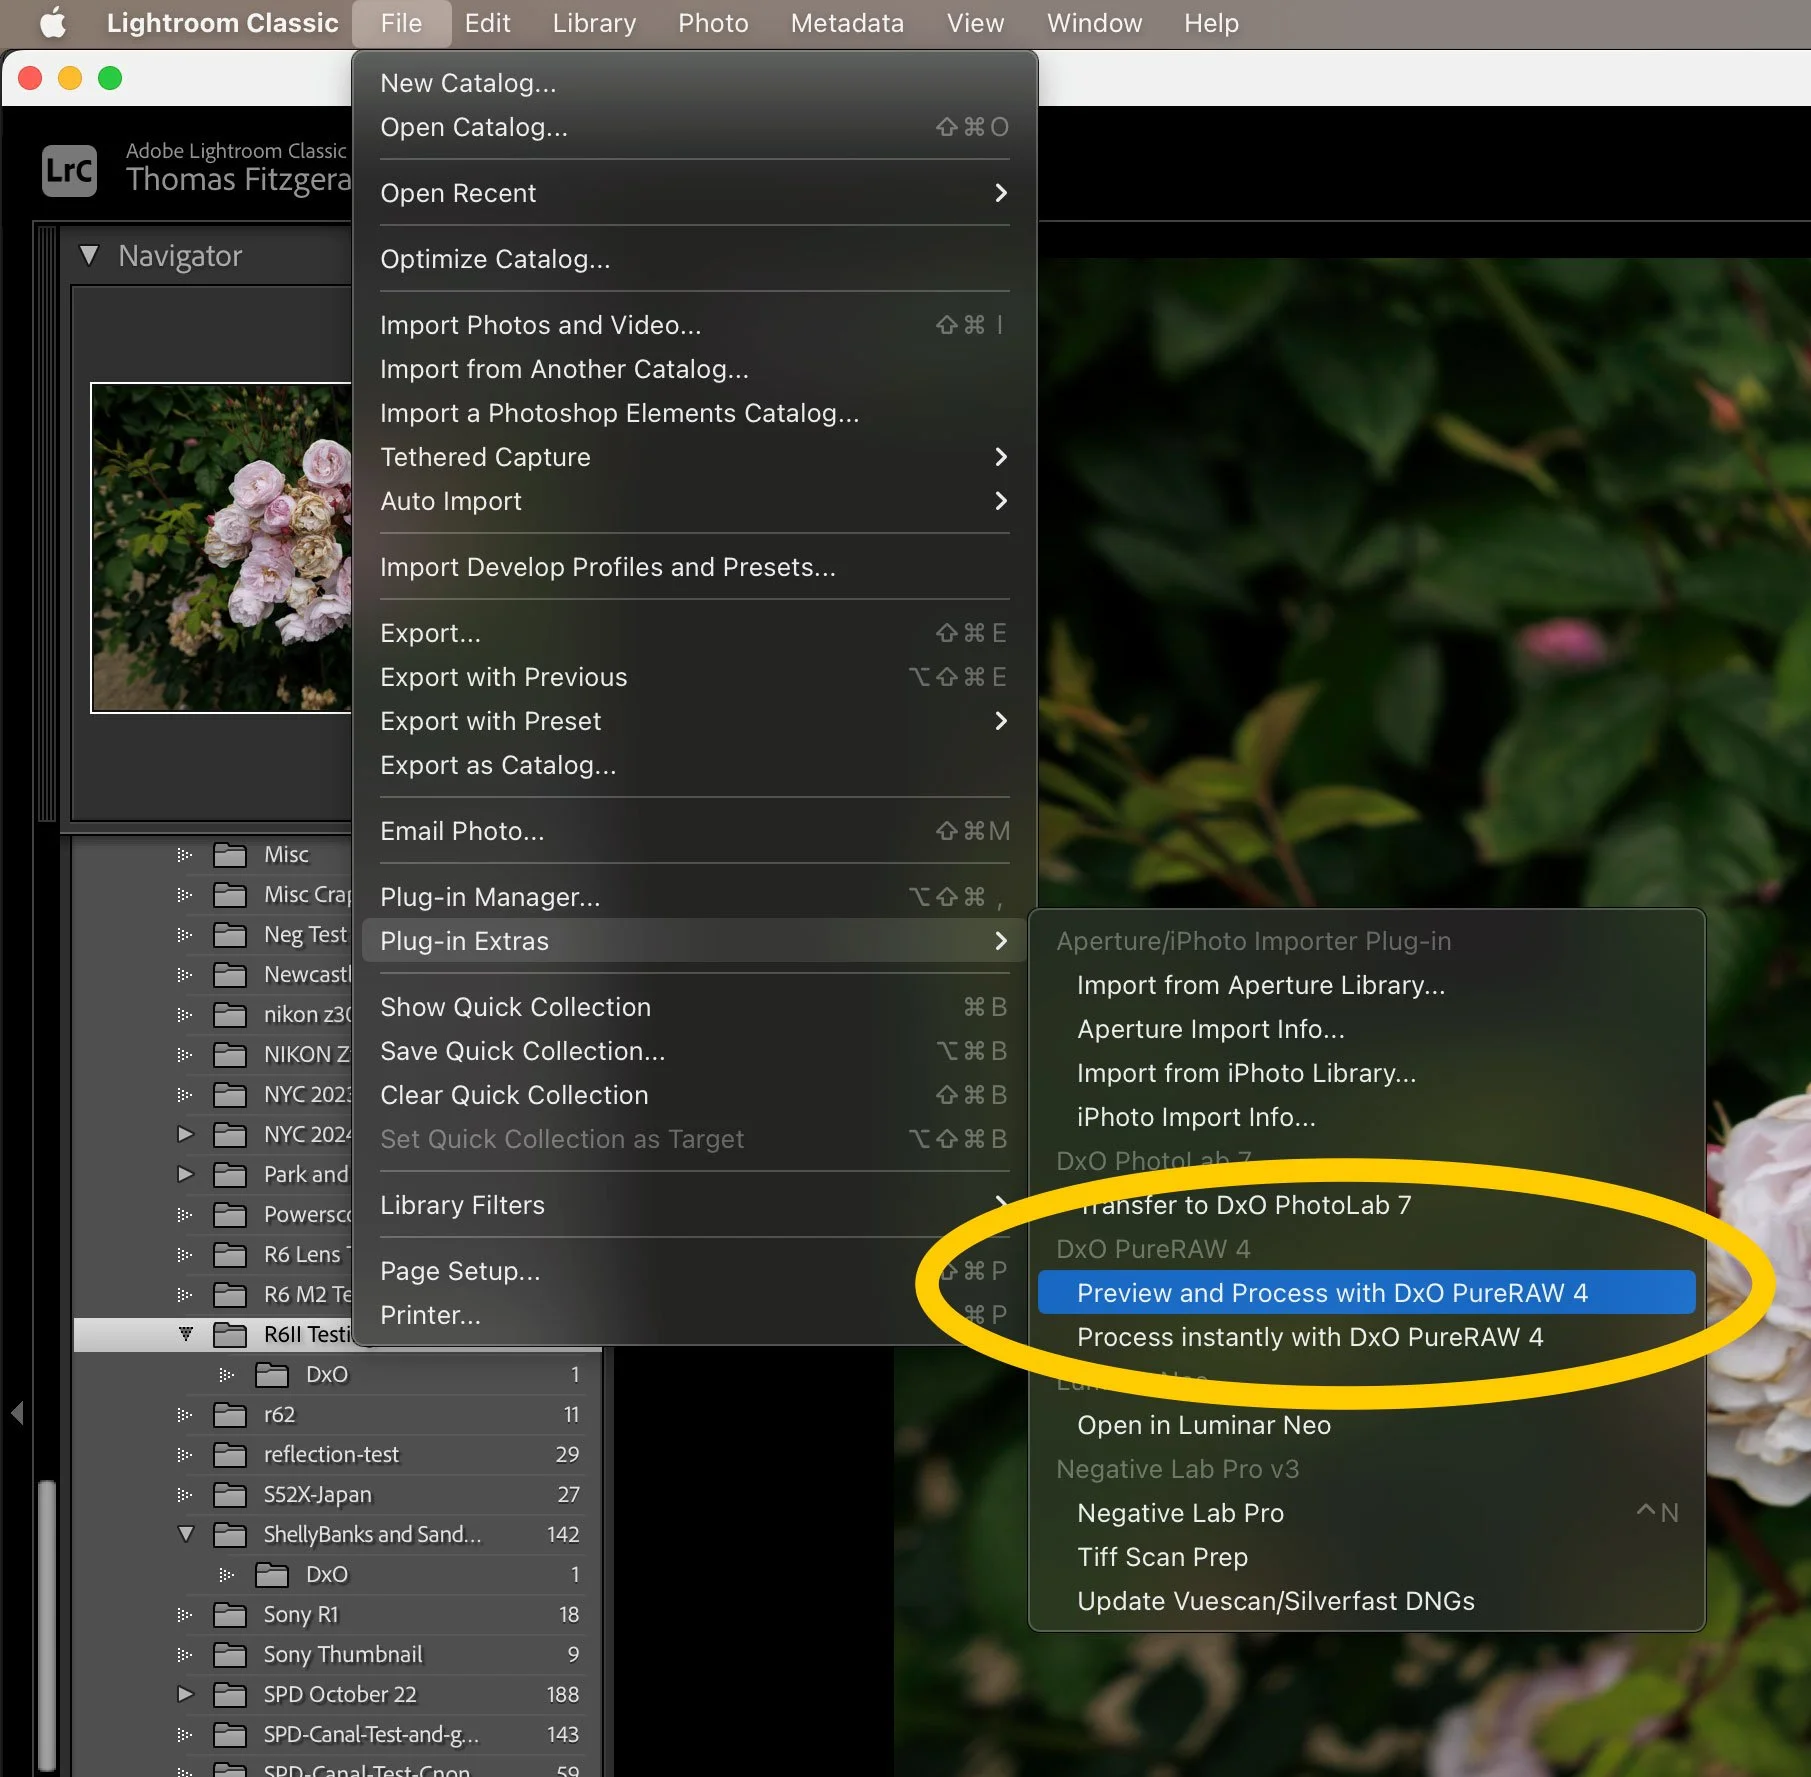
Step 1: Sending the image to PureRAW from Lightroom
If you want to send an image from PureRAW to Lightroom, here’s what to do. Select your image (make sure it’s a RAW file) and then from the File menu choose: Plug-in Extras > Preview and Process with DXO Pure RAW 4. Make sure to use this command rather than the option to process instantly, as it will allow us to make changes to the settings.
Step 2: Adjust the DeepPRIME settings
Your image will now open in PureRAW 4. If it’s your first time opening this combination of camera and lens with the software, it will tell you it is going to download the optics module for that combination.
Once opened, you should see the image on the left with a before and after slider down the middle of the image. On the right you should see the controls for changing the settings. Along the bottom you will see controls for changing the zoom and for updating the preview. I suggest you zoom to 1:1 when adjusting your settings to get a better view of the changes.
On the top right of the window you should see two buttons. One for DeepPRIME and the other for DeepPRIME XD/XD2. Click on the second of these and below this you should see an “Advanced” heading. Below this you should see two sliders: Luminance and Force Details. If you don’t see this click on the Advanced text to expand the controls.
The Luminance slider controls the amount of noise reduction, and Force Details controls the amount of detail recovery used in the AI algorithm. I suggest starting with the following settings:
- Luminance 20
- Force Details 50
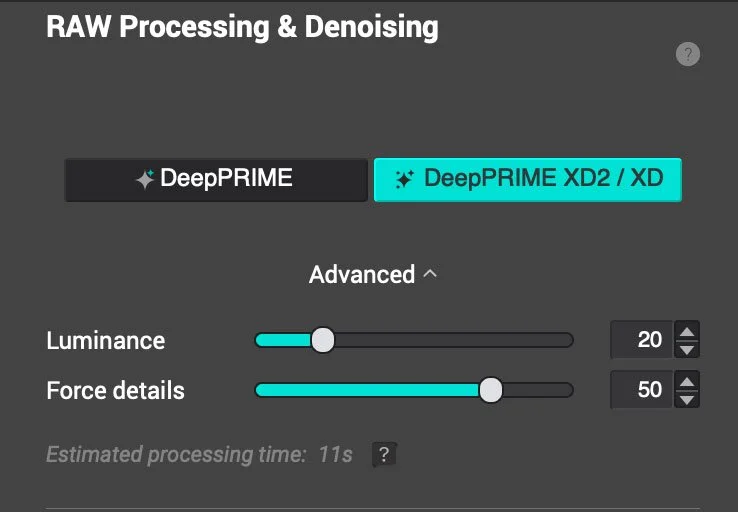
You may think: “why not just turn the Luminance value down to zero?” It is my understanding that you need some luminance value for the force details to work, and my experimentation bears this out, but I may be interpreting this wrong though. (Try it for yourself)
Once you’ve adjusted the settings click on the “Update Preview” button/text at the bottom of the window to update the preview. You can also drag the before/after slider to see the effect of your changes.
This is only part of the puzzle though, and you’ll want to make sure the next section is set correctly too…
Step 3: Adjust the optical correction settings
The Optical Corrections settings control how the sharpening and distortion correction is applied. There are a number of settings here and for the most part you should probably leave these untouched, however, you may want to adjust the Lens Softness setting. Depending on your camera, lens and the subject, the defaults may be too sharp.
As a guide, here are the settings I recommend:
- If you’re using a normal Beyer sensor camera, use either standard or soft. I find that sometimes Standard can look a bit over-sharpened, depending on the subject, but for extracting the most detail that works well. But try the different options. I wouldn’t recommend going higher than this except in specific circumstances as the result will look over processed in my opinion.
- if you’re using a Fuji X-Trans camera then most of the time, I would stick with the soft option here or turn it off altogether. I find that in many cases the Standard option is too strong for X-Trans files and can look over processed. However, as with all things this is a personal preference and some people may not mind this in favour of maximum detail and sharpness.
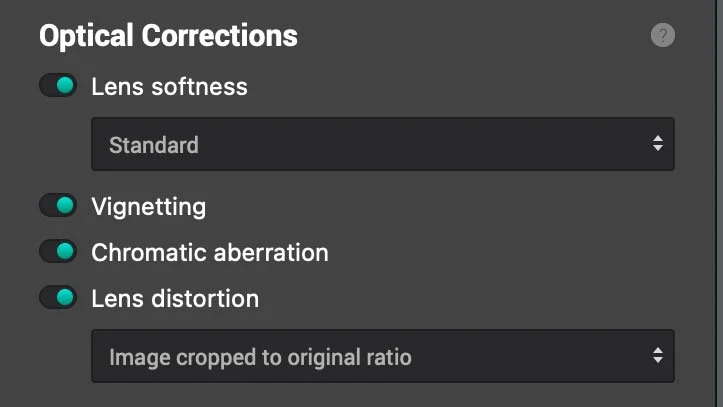
One thing to bear in mind when looking at the preview in Pure RAW is that the “Original RAW” side of the comparison, shows you the image without any sharpening, and so it may make the original look worse that it actually is in Lightroom, where some sharpening is applied. However, you can do a comparison back in Lightroom to get a better idea of the result.
Step 4: Set the destination settings and process the image
Once you are happy with the image processing settings, all you need to do now is set the output settings and process the image. For the most part you want to leave the output format set to DNG. You can choose to put the resulting file in a sub folder of the original location, or a custom folder, or just the original location. I normally just choose the original location.
There’s also the option to set a collection in Lightroom for where the file will be imported to. By default this creates a new collection based on the date and time of the image. You can manually set a different collection but there doesn’t seem to be a way to turn off this function.
Once your happy press Process Now and the file should process and send back to Lightroom.
Some additional notes
There are a few other quirks and things you should be aware of when using PureRAW especially with Lightroom:
- You may notice that every time you send an image to PureRAW from Lightroom it reverts to the default settings. This is obviously quite frustrating. In order to change the “default” settings you need to use the standalone version of PureRAW and then, whatever changes you set there will be the new “default” when you next use the Lightroom plugin
- If you send an already edited image to PureRAW it should retain the edits when it returns to Lightroom (there are some settings in Lightroom that can break this - so if this isn’t working for you, consult the PureRAW documentation). There is one caveat with this. If you have used the AI masks in Lightroom, such as the sky or subject detect, the results may be off when the image returns, because the optical corrections are slightly different. If you’re processing a lot of images, I recommend you do them before making edits. However, if you do come across this problem, there is a way to trick Lightroom into regenerating the mask. Use one of the erase tools on the image, and it will mark the masks as needing an update. You can no go into the mask tool and choose to regenerate the mask.
- Because the image is being sharpened by PureRAW it should have sharpening turned off when it comes back to Lightroom. Normally the software will take care of this for you, but if something looks off, make sure to check that sharpening in Lightroom is turned off on the DNG that PureRAW sends back.
Conclusion
This has been a fairly lengthy post, and there’s a lot to cover here, so I hope you have been able to follow along. The one thing I will say, that is more important than anything else: try it for yourself. Use the settings I have outlined here as a starting point, but tweak and test and see what works for you. Everyone has their own preferences, and what works for one person may not be to the liking of others. There is a trial version available, so if you don’t have PureRaw already, use that to test to see if this is even something you will use. As I said earlier, this won’t work on every image, and you may not like it at all, so try, try and try!
You can find out more details about PureRAW 4 and get the trial version (or purchase) from the DXO Website.
Just a quick note: I am on the DXO affiliate program, so while this was not a sponsored post in that I wasn't paid to write it or even asked to write this, if you do make a purchase through the affiliate links in this document, I will get a small commission.
Example image processed with PureRAW to enhance the texture. Click to view large!