
Photo Editing, Tutorials, Photography News, and More
This blog covers a range of topics from Lightroom, Photoshop, Capture One, Fujifilm, Canon, Nikon, iPhone Photography, and more. If you want to see more of my actual photography work, visit my Portfolio and Photo Journal blog.
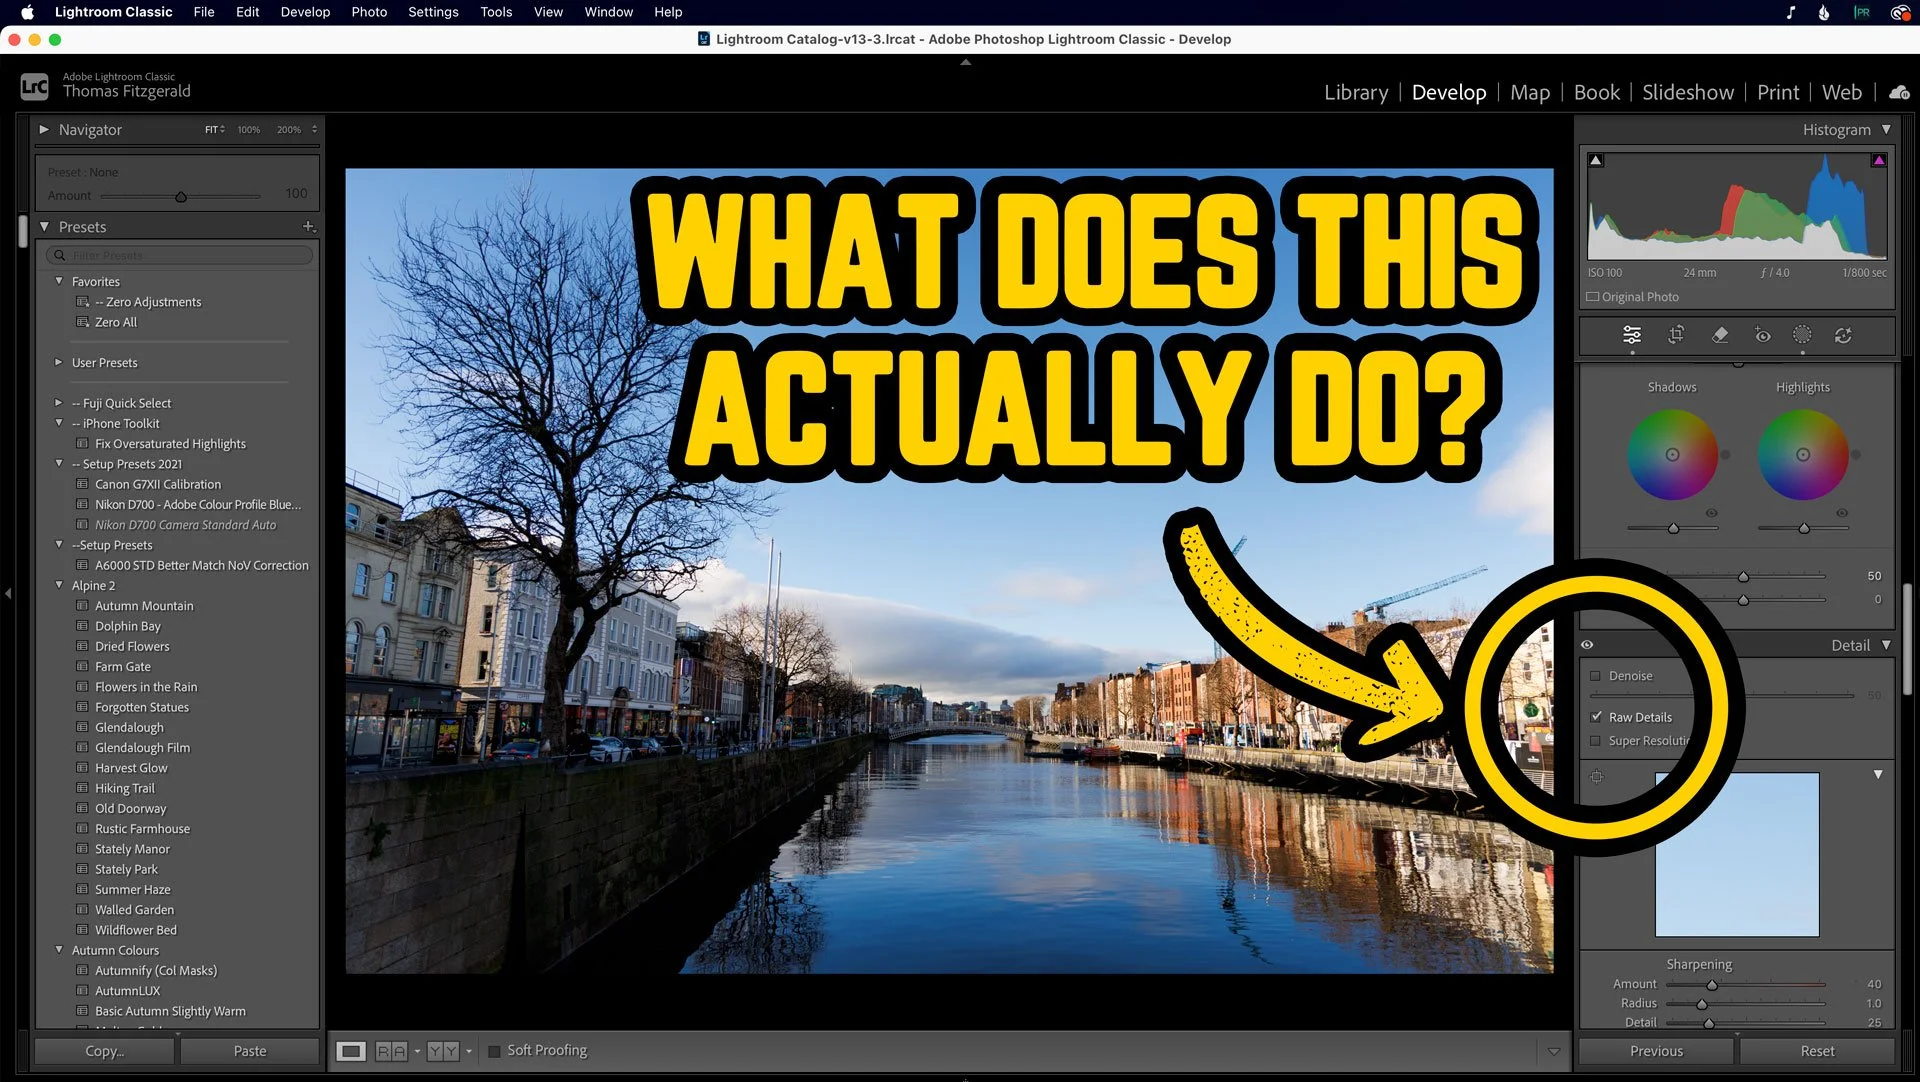
What’s the point of RAW Details in Lightroom? Here’s a perfect example.
Over the past few years, Adobe has been adding to the AI processing functionality of Lightroom, with Denoise and Super Resolution. But the OG of these, the one which was the original “Enhance Details” was what is now known as RAW Details. Most people probably only ever use this now in conjunction with the other two, and you may be wondering what is even the point of RAW details on its own. Well, I was recently going through a few photos I shot the other day, and I saw something that demonstrated perfectly how Raw Details can actually work. Allow me to explain….

Lightroom Quick tip - Global Colour Wheel in the Colour Grading Tool
Here’s a very quick Lightroom tip for you. I was recently processing some Autumn images, and as I was doing some colour grading to enhance the glow of the Autumn/Winter light it occurred to me that there was a feature that people may have missed. That tool is the global Colour Grading tool.

New Video: Landscape Photo Editing - From start to Finish in Lightroom & Photoshop
I was recently visiting a somewhat famous waterfall not too far from where I live and of course I took some photos while I was there. We went primarily to enjoy the fresh air and scenery, so it wasn’t a specific photo shoot, but even so I got some interesting images. One worked out particularly well, and I thought my process for editing it would make an interesting video, so here it is!

Learning and Inspiration with the Lightroom Community "Discover" Page
I recently wrote a blog post about the new “Recommended Presets” feature of Lightroom (Cloud version) and I mentioned that it was driven by the community. The community feature of Lightroom is probably one of the most underrated features of the software. If you are an experienced photographer, you probably haven’t even looked at it, as you may think — that's just for beginners. However, I think its worth a look for anyone, and in this post I’ll explain why.

Video: Editing a Landscape Photo in Capture One - Start to Finish
In this video I take you through my process of editing a landscape photo in Capture One, showing you the tools that I use and my thought process. The photo is one I took a while ago using my old Canon Eos 5 and it was a long exposure shot.

Why you need to sharpen RAW files
I’ve covered the topic of Raw sharpening on my blog many, many times, but every now and then I still get a snarky comment from a viewer or a reader who doesn’t understand how RAW photos work. It is usually along the lines of telling me that I’d be better off “learning to take pictures properly and get them right in camera so they don’t need to be “sharpened”. The thing is though, the reason you need to care about sharpening RAW files actually has nothing to do with whether you captured your photos properly, or whether images are “sharp” in camera or not. It’s actually to do with the way RAW files work.

The Importance of White balance
White Balance is one of those controls that I think a lot of photographers don’t think about or don’t make use of enough. Many just leave it on automatic and don’t worry about it. Yet a poorly chosen white balance can probably affect your photos as much as an improper exposure, and when many people complain about certain cameras having “bad colour” in many cases this can be attributed to the white balance.

My Two Pass Approach to Photo Editing
Whenever I set about editing an image or a whole shoot, I usually break the task down into two passes. First, I do any necessary corrections to the picture, and then I do more creative editing. I use this approach regardless of what software that I’m using, and by doing this, it makes it a bit easier to manage your editing process, and also to make multiple versions of an image. Let me explain a bit further.

How to Improve your Camera’s Colours in Lightroom
When Lightroom first came out, one of the biggest complaints that people had, was that the colours would change when importing RAW files. This led to the inclusion of colour profiles, designed to mimic a camera’s various picture modes, and this seems to address the problem. However, as time has gone by and Lightroom has supported more and more cameras, the quality and accuracy of the included colour profiles have started to vary significantly. If you find that, even with selecting a colour profile that matches what you shot in camera, the colours are still quite a bit off, then this trick may help you resolve the problem.

Are you planning on using Lightroom CC?
I have been going back and forward on whether or not Lightroom CC is something I should bother investing any time in. On the one hand, I do think there are certainly uses for it, but given the lack of features, it’s kind of limiting. Having said that, I do have some ideas for how to get around some of them. However, before investing any time and energy in these, I wanted to know if anyone was actually planning on using it.

More Details abut my New Membership Subscription on Patreon
It’s been over a week since I stared offering a membership option on Patreon, and I want to thank those who’ve already joined up. I also realised that I didn’t explain it very well the last time I posted about it, so allow me to elaborate a bit.

Video: Watch me create a HDR Image using Capture One, Aurora HDR and Luminar
In this video I take a bracketed exposure that I shot on a Fuji X-Pro 2 and starting with Capture One, I look at the process of creating a HDR using Aurora HDR. I then do some additional editing in Luminar, before bringing the final image back into Capture One.

Using Lightroom and Aurora HDR to create a HDR Image
I was recently working on some bracketed exposures that I shot while on a walk by the coast north of Dublin. It was a beautiful and moody day, but the light was pretty strong, and I was shooting with my D700, which hasn’t the greatest dynamic range. With that in mind, I shot multiple exposures with the aim of combining them later so as not to loose any detail in the highlights and shadows. I originally tried combining the exposures in Lightroom, but I wasn’t happy with the results, so instead I decided to use Aurora HDR.

Enhancing Images with Luminar
I’ve talked about MacPhun’s Luminar here before. Specifically I discussed it in the context of the software being a new RAW converter, and I talked about the possibilities it offers. However, there’s another way to use the application, which also works really well, and that’s as a plug-in. You can use it as a plug-in for either Photoshop or Lightroom, and it offers a lot of functionality. Recently I was using it on an actual project, and so I thought that I’d discuss what I did and how I used the software.

Shooting on a Dull Day
At this time of the year, the days can get very dark and dreary here in Ireland. With the short winter days, when it’s sunny it’s actually quite beautiful, but when it clouds over, it becomes very dark and dreary. On days like this, it’s often tempting not to bother shooting, and certainly, I’ve been put off by what seems like bad light. However, as Jay Maisel once said, there’s no such thing as bad light, just difficult light.