
Using “Enhance” in Lightroom for Fuji Users – Answers to the most common questions
The Enhance function in Lightroom has been around for a while now. It was originally called“Enhance Details” but changed its name to just “Enhance” when the super resolution feature was added. For Fuji shooters, Enhance offers a way to get improved demosiacing inside of Lightroom without having to use third-party software. Using it on Fuji RAF files can provide significantly better rendering of detail in Fuji files, but it does come with some downsides.
Despite the feature being available or some time now, I still get lots of questions about it, and there are still plenty of misconceptions out there. In this post, I will attempt to answer some of those in the form of a slightly snarky, imaginary Q&A and try to help you decide whether it is something you should be using or not.
Will it improve the quality of My Fuji files?
Yes.
Seriously, though, it does substantially improve the quality of detail compared to the native processing of Fuji Raw files. How much of an improvement, or whether or not this is enough of a difference to be with it really depends on the type of photography you shoot, and how much you care about technical image quality.
If you shoot portraits primarily, you will notice less of a difference than if you shoot landscapes, for example. The differences are especially noticeable on things like trees and foliage, although you can also see it on hair and finely detailed clothing.
It’s also particularly noticeable on textures like concrete or stone, where there is a repetition of natural texture. Here it can make a big difference.
Pay particular attention to the big clump of tree branches - the RAF file has quite a bit of detail smearing going on whereas the DNG is much more natural looking. Click to view larger (may not be obvious scaled down on the page)
Click to view larger (may not be obvious scaled down on the page)
I’ve heard it only makes a difference if you pixel peep, and I’m not a dirty pixel peeper.
This is a yes and no.
You can only clearly see the difference when viewing your files at 1:1, but in my experience, I can sometimes see a difference when an image is printed. It’s not as quantifiable, but you can tell something is not right, or at least I can, in some cases. If you can’t, that’s ok too, as everyone perceives things differently.
The bigger difference is if you need to crop in at any point. Then you are magnifying the differences as well. Enhanced files also stand up to processing more, and suffer less artefacts when pushing things like sharpening or detail enhancements. Enhanced files won’t get the dreaded worm artefacts when you push the sharpening, compared to the RAF files. Detail will remain clean and natural looking compared to processing an RAF file.
At the end of the day, and I know I’ll get hate mail for this, but Lightroom’s default conversions are just wrong. They render false and blurred detail, and if you’re ok with that, that’s fine. I, personally, would rather it be correct, even if it’s not noticable on Instagram for example. I know it’s there. Unfortunately, over the years, this has become controversial for some reason. If it doesn’t bother you that’s fine - really it is. I’m not precious about it either way. I only take issue when people totally gaslight the situation and pretend that there is no difference whatsever or that Adobe’s default RAF rendering has no problems. Adobe knew it had problems and using Enhance details to provide a better demosaic was their solution.
Also, pixel peeping is nothing to be ashamed of, so there!
I don’t see any difference, you must be lying.
No, I’m not.
But people have different needs, and often people see things differently. If you can’t see a difference, good for you, you’ve saved yourself hours of work. Go have a drink to celebrate.
Similarly, some people can see a difference, but it’s just not a priority. Again, this is fine, so get on with your life and pretend this never happened. If the quality of RAF files doesn’t bother you as it is, then there’s no reason to use Enhance if you don’t want to. If you (and your clients) are happy, that's great.
I read that Fuji processing in Lightroom is better now, so I don’t need to use Enhance anyway
Nope.
The default fuji decoding engine in Lightroom hasn’t changed since 2015. Every time a new version comes out people post this, but it hasn’t actually changed. I suspect people are going back over old files and misremembering how they look. I’ve checked with files I rendered out years ago, and it’s exactly the same.
Does it take long to process?
It depends on your computer: If you have an older system, it may take a long time. Most modern computers only take a couple of seconds. I’m currently using a MacBook Pro M1 (original M1, not Pro or Max) and it takes around 2-4 seconds to convert a file.
Why are enhanced files so large?
This is probably the most common question I get, and the area where there is the most misunderstanding. It’s to do with the way different formats store image data. Raw files aren’t really traditional image files. They basically are a raw dump of the data from the camera's sensor with minimal processing, and additional metadata with instructions on how to put it back together.
The information contains a readout of the level of light hitting the sensor at each photo site. This is essentially a single value for each “pixel” but this has to be interpolated using the information about the colour sensor to create a colour image. Because the colour sensor is a known quantity, you don’t need to store this for each pixel in the image; therefore, a raw file is really only one channel of data. When this is demosaiced, the software combines what it knows about the light hitting each photo site, together with what it knows about the colour filter over the sensor, to determine what the colour is for each pixel. This is now RGB data and therefore requires three channels (as opposed to one) so the resulting file is much bigger.
Now, this is simplifying it significantly and there’s more than that going on (tone curve, colour profiles and so on), but that’s the gist of what’s happening. The upshot of it is, what was originally one channel is now three channels.
It is better or worse than Iridient X-Transformer

In terms of image quality, it’s very similar. Some images look a little better, others look a little worse. It’s really subjective and in my experience, I slightly favour the results from Enhance. But it’s a personal judgement.
However, X-Transformer does have one advantage. You can select an option to compress the resulting DNG files with X-Transformer, and this results in a smaller file. Depending on the option you choose, it can be a much smaller file, but this comes with some disadvantages and may affect image quality.
Enhance, on the other hand, has the advantage of being built in, and therefore doesn’t cost anything extra
How does Enhance compare to Capture One?
Image quality is broadly similar. The differences are pretty close in my opinion, so it’s quite subjective. Some images may look better in Capture One, and some may look better in Lightroom with Enhance.
How does it compare to Pure Raw?
Pure Raw in my opinion can extract more detail, and can produce a cleaner file, but occasionally the results look over-sharpened to me, and sometimes it will smoothen out fine textural detail too much, loosing some of the subtle detail. But for high ISO files, it may produce a better result.
What are the downsides to using Enhance?
There are three big downsides to using Enhance.
First, as mentioned above, the files are much larger. This leads to the second disadvantage, they can take monger to load into Lightroom’s develop module. It will depend on your drive speed, but on slower or older drives it can be noticeable.
Thirdly, it can take time to process, especially if you have an older computer. If you have a lot of files that you want to batch process, it can take quite some time.
How do I use Enhance?
Using Enhance to improve the Fuji deomsaicing is straightforward. Simply select a RAW file, or multiple Raw files, and right click. From the contextual menu, choose “Enhance”. Alternatively, you can find it in the Photo menu or use the shortcut: Ctrl + Option + i
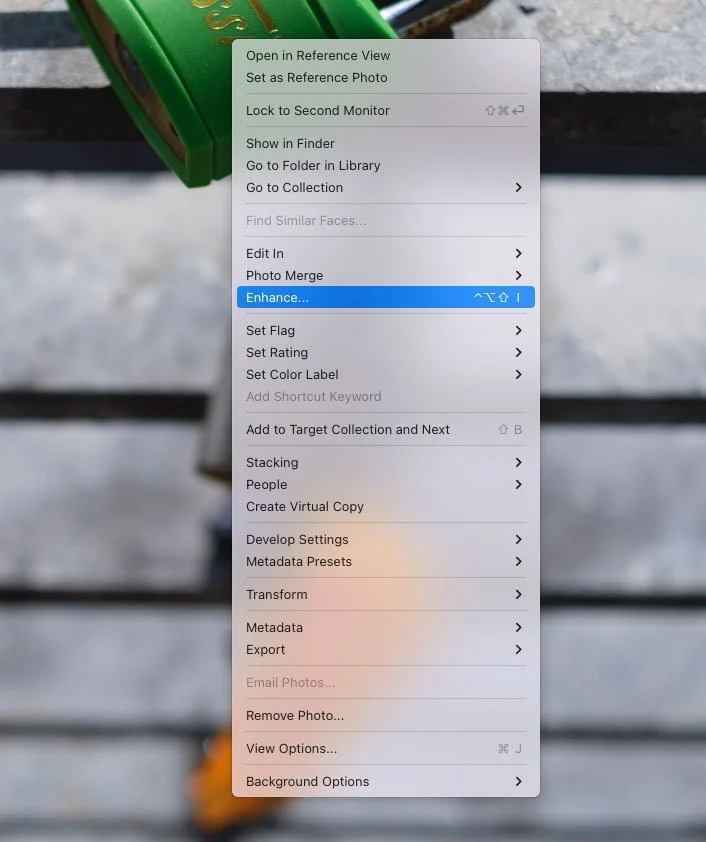

This will bring up the preview window which has some options. Make sure Super Resolution is unchecked, or you will create truly massive files, and then click OK.
That’s all there is to it. If you’re processing a batch of images, it’s best to leave it alone while it does its thing. I’ve found that it moves images around a bit and gets confused if you start trying to do other things while it’s working. Also, it will be faster. You can probably edit in the Develop module alright, but just beware.
Should I use Enhance before or after I edit a file?
In general, it doesn’t actually matter. When you use Enhance, your image will still be editable, and any edits you have done will still be applied and editable after you enhance the file, so it’s ok to do after you have edited.
There are actually lots of different workflows you can do when working with enhance, and I will cover these in a future post.
Conclusion
That’s pretty much all there is to it that I can think of right now, although I’m sure I’m forgetting something. At the end of the day, if you’re happy with the default conversions, or you don’t really see the difference, then you don’t need to use it, and it’s not something you should worry about. But you should at least try it and see if it’s something that improves your images enough for you to want to use it or not. It’s part of Lightroom, so you don’t lose anything by trying.
Help Support the Blog
Check out my eBooks and Presets
Check out my photography eBooks , Capture One Styles and Lightroom Presets available on GumRoad.
Buy me a coffee!
If you want to say thanks or help, then you can feed my caffeine habit and buy me a coffee via PayPal with a one off donation to my PayPal tip jar. (Please note that PayPal doesn’t make it easy to respond to these so just know you are thanked in advance)
Join our Facebook Group
If you want to discuss anything you’ve read here on my website, or saw on my youtube channel, or if you want to share images you’ve created using any of my techniques or presets, then I’ve started a new Facebook Group just for that.
Note that this post contains paid affiliate links. We get a small commission for purchases made through these links, which helps run this site.