
Use Layers to Separate Sharpening Workflows in Capture One
When you are working with RAW files in any software, an important part of the conversion process is sharpening. Sharpening must be done to compensate for the inherent softness that is a part of the raw conversion process. I’ve discussed this before, but there are times when you need to do additional sharpening on top of the RAW level sharpening. While some software separates the RAW sharpening pass, most just have the one set of overall sharpening controls. In Capture One, you can use layers to split your workflow when you need to do more creative sharpening.
This is a tip based on an excerpt in my new Capture One Fuji guide, but it’s expanded and adapted for a wider audience here. This is kind of a technical topic and a technical post, but I’ll do my best to explain!
Capture One’s sharpening controls are quite comprehensive, and they do have a set of pre-shaprning controls in the Lens correction tab (in the form of diffraction correction) but this is normally used in conjunction with the main sharpening controls as part of the initial raw conversion process. (The official description of this in Capture One is a “three pass sharpening” system, but this shouldn’t be confused with the stages of sharpening that normally occur - see below) I go into this a in much more detail in my Capture One Fuji guide, but in a nutshell, there are three sharpening stages: Input sharpening, which is the raw conversion stage. Creative Sharpening - which is where you need to do additional sharpening, and output sharpening, which is done to compensate for softening when scaling the image of output, or when printing.
Related article: Why you need to Sharpen Raw Files
Most people just do the first two stages together and don’t actually think of it as anything other than just “sharpening”. This is also how I work most of the time. However, if you do need to do more creative sharpening, to bring out detail in a landscape for example, then it can sometimes be helpful to use different settings than you would during the raw conversion pass. Just cranking up the sharpening amount isn’t necessarily the best option.
Some people switch to photoshop for this and se things like high pass sharpening and so on, but in Capture One Pro, you can do this using layers. The layer tools in Capture One give you full control over sharpening, and you can use different settings in each layer. This is unlike Lightroom, which does let you add sharpening in the selective editing tools (gradient, brush and so on) but doesn’t allow you to control any other aspect.
To do this in Capture One, you need to create a new filled layer. You can re-name it sharpening in the layers panel to make it easy to recognise if you plan on using more layers. Here’s what to do step by step (this is an excerpt from my Capture One Fuji Guide):
- Go to the detail tool tab
- Make your normal changes to sharpening or use the defaults if they are to your taste.
- In the layers panel, click and hold on the + menu and select “New Filled Layer”
- You can now do additional sharpening on this layer.
- If you wish, you can use the brush tools to paint away areas that you may not want to have additional sharpening.
As an example I would normally use the following settings as default when working with RAW files. The camera used isn’t important here.
- Amount: 140
- Radius: 0.8
- Threshold: 0
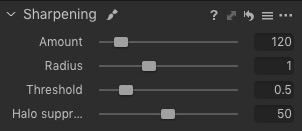
This works fine for the RAW conversion stage, but say I’m working on a landscape shot for example and I want to enhance the details further, or even if my lens was slightly soft and I wanted to add some extra sharpening. In this case I might want to use a different radius for example. What I wold do is create a new filled layer and apply the following settings to additional sharpening (these are just example settings):
- Amount 120
- Radius: 1.0
- Threshold: .5
- Halo Suppression: 20


To see these properly, click on the image to view int he Lightbox. You can then toggle left and right to see before and after.
I can now also use the layer slider to adjust the overall “additional” sharpening without affecting the base level that I’ve used as part of the RAW conversion process. I can use this in conjunction with clarity and structure to enhance details further, but you have to be careful to avoid over-sharpening. The halo supression slider can help here.

It’s hard to represent this properly on a website where the is compression and scaling, so the best thing to do is try it on your own images.
The most important thing to do when sharpening is to make sure you’re working at 1:1 when adjusting sharpening. Otherwise capture One’s previews system is not rendering he sharpening properly, and you will not be correctly editing your file for what the final result will be like.
I get that this is quite a complex and technical topic. Unfortunately there is a lot of misinformation out there. I’ve been reading comments from a couple of people who have been leaving them all over the place, saying hat you should be turning the shaping off altogether and just using things like structure or texture (in Lightroom) and this is just plain wrong. Somehow, this has become a controversial topic in some circles too, for reasons I can’t quite understand.
Sharpening is a vital part of the RAW conversion process, but when you need to do additional sharpening on top of that, I think thats where a lot of the confusion arises, as many people don’t appreciate that it’s actually two different things. By separating passes using Layers like this in Capture One, it can help you visualise this more, and also give you more control. Most of the time you won’t need to do this, but when you do, its an option, and you can do it without having to go to another application. It’s one of things that I really like about Capture One.
Speaking of Capture One, if you’re a Fuji Shooter check out my newest guide for Processing Raw files in Capture One. If you don’t already have Capture One, they are currently having a sale on (at the time of writing this) for the Fuji and Sony versions with 50% off.
Help Support the Blog
This blog is pretty much my day job now and I work to bring you my own take on photography, both tutorials and tips, as well as inspiration from my own art. I support this work, and my YouTube channel entirely either via sales of my eBooks and Lightroom presets, or the kind support of my readers. (I also have some affiliate ads). Running all this isn’t cheap, and so If you like what you see and you want to help keep this all going, there are a number of ways you can do so:
- If you’re interested in buying Capture One but haven’t yet bought your own copy yet, then by going through my affiliate link I’ll get a small commission!
- You can buy any of my Capture One Styles through my online store!
- If you’re buying anything on Amazon, you can help by using my affiliate link: Amazon US or Amazon UK.
- You can support me on Patreon. If you like what I do here and find the information useful, then you can help by subscribing to me on Patreon. As well as helping keep this blog going with even more useful news, tips, tutorials and more, members also get special Patreon only feed, which gives you behind the scenes content, as well as monthly downloads (for the top tier), for only €2 or €5 a month Stop by and check it out.
- Buy me a coffee / Tip Jar. If you want to support the blog but don't want to sign up for Patreon, you can buy me a coffee via PayPal with a one off donation to my PayPal tip jar.
You can see more of my photography and keep up to date by following me on social media and checking out my other websites: