
How to Use DxO PhotoLab to pre-process Fuji Raw files for Lightroom
DXO labs recently added Fujifilm support to PhotoLab 5, the companies Raw processing application. The support is currently in beta, but my initial testing shows that it gives promising results, that are among the best you can achieve. DXO’s Raw Pre-Processing application, Pure Raw, currently does not support Fuji files. However, if you want to use DXO’s technology with Lightroom, you can still use PhotoLab as a way to pre-bake your Fujifilm Raw files for use with Adobe applications.

Isn’t this excessive?
If you’re thinking that using PhotoLab as a RAW pre-processor is a bit excessive, then you would be absolutely right. I’m not suggesting for a second that you go out and buy PhotoLab just to use it to convert your Fuji files. Given the price of the software, that would be crazy. Hopefully, Fujifilm Raw support will come to Pure Raw, the company’s dedicated app for this, sometime soon. In the meantime, if you have PhotoLab (or download the trial) and you want to try this, then you’ll find instructions for the process below.
Having said all that, there are some advantages to using PhotoLab over PureRaw (apart from the fact that this doesn’t work in PureRaw yet). You get much more control over the process, and you can adjust the amount of de-noise and sharpening that occur during the conversion process. You can’t do this with PureRaw — it’s just on or off.
Photo Lab DNG Pre Processed DNG vs Original RAF file in Lightroom.
Round Tripping or Process First?
As with any of these kinds of workflows, you’re presented with two options — convert everything first, or process images one at a time. Given the time and file sizes involved, you’re probably better processing one at a time, or in small batches.
Luckily, PhotoLab makes it easy to send files from Lightroom to Photo Lab and back.
Here’s what to do to send your images to PhotoLab
- In Lightroom, Select the photos you want to send to PhotoLab
- From the File Menu, choose: Plug-in Extras > Transfer to Photo Lab 5
That’s all you have to do. This will then open the RAW files in PhotoLab. If it’s the first time you’ve used this lens and camera combination in PhotoLab, it will ask you to download the corresponding Lens Correction Module(s). Just click download when the pop-up dialog appears.
How to pre-process in PhotoLab and what settings to use
The settings to use when pre-processing files in PhotoLab are more or less the same as what I recommended in my previous article about using PhotoLab for Fuji files, but with a few exceptions. The first is that you don’t need to worry about setting the colour profile, as you’re going to set that in Lightroom anyway. The second thing that is different, is that you’re only going to use the DNG with optical corrections only setting. If you hadn’t read that previous article, don’t worry, I’m going to cover everything again now anyway.
To get the best quality conversions with PhotoLab, you need to use the software’s Deep Prime noise reduction technology. So, what is Deep Prime? The technology uses artificial intelligence to denoise an image at the demosiacing stage of the raw conversion process. However, when DXO added Fujifilm support they tapped into the Deep Prime engine to get superior raw conversions, and this seems to hold true based on my experience.
To turn on Deep Prime, select an image, and go to the detail tab in the corrections interface (top right) and under the Denoise heading turn Deep Prime on. Notice that you won’t see the effects of Deep Prime straight away. This is because Deep Prime is only applied at the export stage.
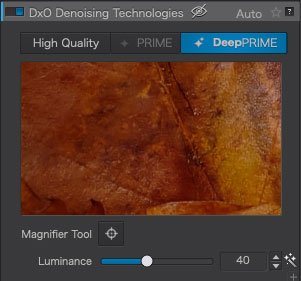
The only other thing you might need to do is turn down the default lens sharpness. In my experience, this can be a bit too much and can leave your images looking a little too sharp, or over processed. However, as this is a personal preference, I suggest you experiment with this on a few images and make your own decision. I usually set the Global amount to -0.5
Furthermore, make sure Chromatic Aberration correction is turned on. It should be by default, but just in case it’s been turned off, make sure it is on.
Don’t make any adjustments to any of the other parameters, including exposure, contrast etc. You will make the bulk of your edits back in Lightroom, and these settings won’t be exported anyway.
The next thing you need to do is apply these changes to all the images you want to process, so that Deep Prime is enabled for all the photos you want to edit. To do this, on the image you have been working with selected, go to the Image menu and choose Copy Correction Settings or press Command + Shift + C.
Now select all the other images to which you wish to apply the settings to and from the Image menu choose “Paste Correction Settings” or Command + Shift + V. This will apply the settings to all of your images.
Exporting back to Lightroom
The final part of the process is getting your photos back to Lightroom. To do this, you will export as a DNG. When you use the correct settings in DXO photo lab, the software will export a DNG file which is demosiaced with the optical corrections and denoise/sharpness applied, but will still be editable in every other way including highlight recovery and setting the colour profiles. If you’re familiar with Iridient X-Transformer, it’s a similar type of DNG.
Here’s what to do:
- Select all the images you wish to export
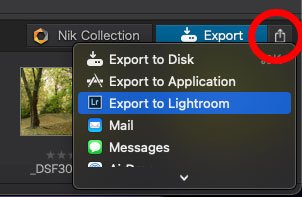
- Click on the share button at the bottom of the adjustments panel
- Select Export to Lightroom from the pop-up menu.
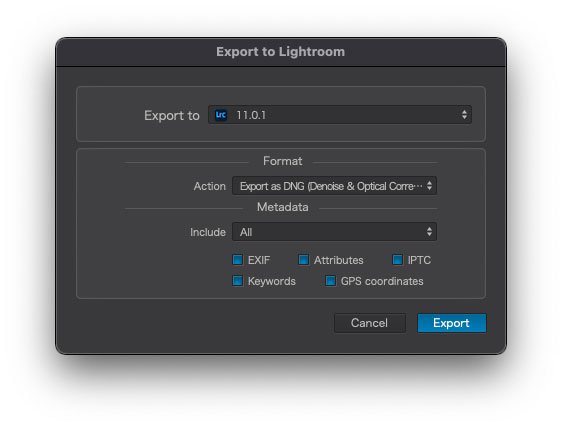
- Under the “Format” heading, select the Action pop-up menu and select “Export as DNG (Denoise and optical corrections only)
- If you want the files to stay in the same folder as the original, leave this setting in the folder section. This is the best option to make it easy to round-trip back to Lightroom.
- Click Export
- This will export your images as DNG files into the same directory as the RAW files and send the images back to Lightroom.
- Inside of Lightroom the images will appear in a new collection set called DXO photo Lab and within that separated by Date. They will also be in the same folders as the original.
- If you had settings applied to the image before sending to Photo Lab, they may be applied to the new DNG files that re-imported. It is essential that you disable any sharpening or noise reduction that may have been applied. Because sharpening and noise reduction were done in Photo Lab as part of the conversion process, if you apply them again, you will over-sharpen and over process your photos.
Depending on your computer, this may take a bit of time. Because it uses Machine Learning to process Deep Prime, it can be slow on older computers. However, the flip side of this is that if you have an Apple Silicon-based Mac, it uses the ML cores, and it will speed up this process significantly
There are actually several ways you can go about this, and this has been just one workflow. You can also export the photos manually and re-sync the folder. You can also start with DxO PhotoLab without going to Lightroom first. Once you get the hang of the basics, you can find the workflow that works best for you.
Summary
That, in a nutshell, is the process for using PhotoLab to pre-process your images for use in Lightroom.
Is it worth it? If you already have PhotoLab, then… maybe.
Is it better than the results from Lightroom’s “Enhance” function? It’s very close. In my opinion, it’s a little better, especially with images where there is a lot of foliage, but as I said - it's very close. The results are generally very clean and detailed, without any worm artefacts or detail smudging. For high ISO images, Deep Prime does an excellent job of de-noising the image and retaining details, so in that case the results will definitely be better, in my opinion.
Is it better than X-Transformer? Again, I think it is, but again it’s close, and your opinion may differ from mine. However, the big problem with X-Transformer is that, at the time of writing this, the software hasn’t been updated in over a year, and I’m not sure if the developer is ever going to update it again. It’s missing support for any of the cameras Fuji has released in the past year, including the popular X-E4. I don’t know what’s happening there, and maybe it will be updated shortly, but for now, it’s not an option if you have a newer camera that isn’t supported.
What about Capture One? Can you use that to Pre-Process files for use with Lightroom? You could use Capture One to pre-process your Fuji files, but you can’t do it in the same way to make a DNG that still retains the same level of editibility as you can with Photo Lab. Capture One will only create flat files and these will have the tone curve baked in and clipped highlights will be unrecoverable. So, it’s not really the same kind of thing. If you want to use Capture One, you’re best using it as a replacement for Lightroom, rather than a pre-processor. In my opinion, this is probably a better all round solution, but if you want to stick with Lightroom, then it’s not the best option.
At the end of the day, as I said at the start, it is a little excessive to use PhotoLab just to pre-process your images. They do have an application especially for this, but it doesn’t yet support Fuji files. This application, DXO Pure Raw, is based on the same engine as DXO Photo Lab, so hopefully in the future it will be supported. For now, the only way to use this engine and Deep Prime with Fujifilm Raw files is to use PhotoLab 5. If you don’t already have the PhotoLab, you can try it out for 30 days and see if this is something you would ever use. It’s worth also remembering that PhotoLab’s Fuji support is still in beta and so will likely improve over time too. If you do think that this isn’t worth it, then by all means stick with one of the many other methods for getting the best from your Fuji raw files in Lightroom.
Help Support the Blog
Buy from our affiliates
If you want to help support our blog, you can do so if you buy anything from our affiliate partners:
- Capture One Pro is available in both subscription and perpetual licences available, in versions for all cameras, Fuji specific , Sony specific or Nikon specific.
- Capture One Professional Style Kits from Capture One.
- Luminar AI is available from Skylum Software. Get a 10% discount using the following code: TFP10
- Nik Collection from DXO Labs
- DXO Photo Lab
- DXO Pure Raw
- My Amazon Photo Recommendations
- My Favourite Mac Utility Application: Clean My Mac X from MacPaw
- The VPN I use regularly - Nord VPN - Save on 2 year deal (valid at the time of posting)
If you buy through the above links, we get a small commission, which helps run this site.
Check out my Capture One Style Packs
If you’re looking for some Film Effect, or black and White style packs for Capture One, check out my Capture One styles on my Gum Road Store.
Buy me a coffee!
If you’d rather not use Patreon, but still want to say thanks or help, then you can feed my caffeine habit and buy me a coffee via PayPal with a one off donation to my PayPal tip jar.
Join our Facebook Group
If you want to discuss anything you’ve read here on my website, or saw on my youtube channel, or if you want to share images you’ve created using any of my techniques or presets, then I’ve started a new Facebook Group just for that.
Note that this post contains paid affiliate links. We get a small commission for purchases made through these links, which helps run this site.