Lightroom trick - How to get an Overall Adjustments Amount Slider
This is a little trick I stumbled across the other day - almost by accident. I was working on editing a photo in Lightroom, and I had made quite a few edits, but I just couldn’t get it where I wanted it. I said to myself: “I wish there was a way I could just dial all the adjustments back a little”. Then it occurred to me - there actually is a way to do that. It requires a few steps and a little roundabout thinking, but it essentially gives you a way to adjust the overall amount of your adjustments with a single slider.
The key to this technique is the recently added ability to adjust the amount of an applied preset. So, to turn this into an overall adjustments slider, all you have to do is save your edits as a preset, reset your image, and then reapply the preset you just created. You’ll now have a slider that you can use to adjust the overall amount of adjustments in the image. It works really well too, and you can use it to tone down your edits, or increase the effect you already have. For those that prefer a set of step by step instructions, here’s what to do:
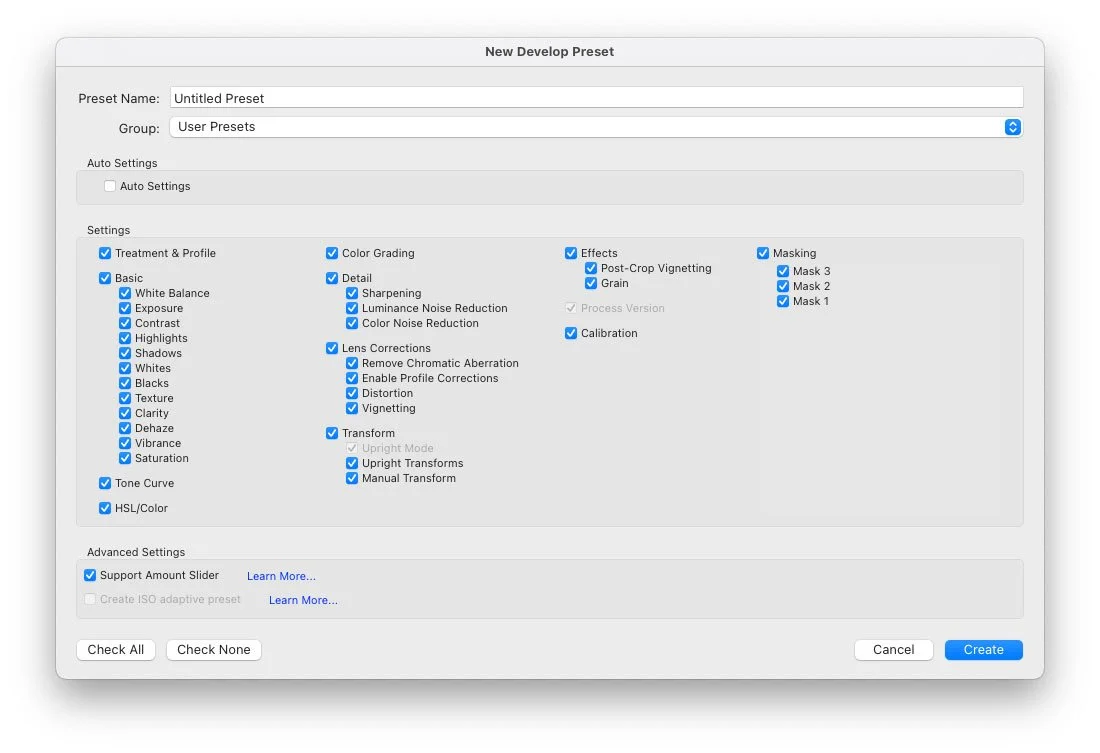
- Save your edits as a preset. Make sure to check everything in the save presets window, except Auto settings. It’s especially important that you have the option to support the amount slider turned on.
- Once you’ve saved your image, reset it by choosing the reset button on the bottom right of the Lightroom develop module interface
- Apply the preset you just saved.
- You now have a slider which you can use to adjust the overall amount of edits on your photo.
Note: You can actually probably skip the reset step, but I’ve left it in as it prevents confusion - In my opinion. But - I think you can just apply the preset without actually resetting because youve saved everything.
There are a few caveats though. If you want to do this on an image on which you have previously used the crop tool, then you’ll need to copy the crop first before resetting your image, and then reapplying the crop by pasting it back before you use the preset to apply the other edits. So for a crop the process would be:
- Save your edits as a preset (as above) and make sure all of the options are ticked except Auto Settings.
- Now choose to Copy your Adjustments, by pressing Command = C / Ctrl + C and this time turn everything off except the crop options.
- Rest your image.
- Press Command + V to apply the Crop
- Apply the previously saved preset.
Another important thing to be aware of is that as soon as you move an individual adjustment slider in the develop module, you’ll loose the overall amount slider.
As you don’t want to end up with hundreds of presets every time you do this, I’ve just created one called “Working” which is saved in the User Presets folder. So when I want to do this on a new image, I just choose the option to update the preset rather than creating a new one each time.
Conclusion
This might seem like a long winded process, but it’s actually pretty straight forward, and only takes a second to do. I’ve been using this a lot since it cured to me, and it’s a really useful technique. I love these kinds of hacks for features in software!
Help Support the Blog
Buy from our affiliates
If you want to help support our blog, you can do so if you buy anything from our affiliate partners:
- Nik Collection from DXO Labs
- DXO Photo Lab
- DXO Pure Raw
- My Amazon Photo Recommendations
- My Favourite Mac Utility Application: Clean My Mac X from MacPaw
- If you don’t already have Lightroom, Photoshop or Adobe Creative Cloud, you can sign up here.
If you buy through the above links, we get a small commission, which helps run this site.
Check out my Capture One Style Packs, Lightroom Presets and eBooks
If you’re looking for some Film Effect, or black and White style packs for Capture One, Presets for Lightroom or Photography related eBooks, check out my Gum Road Store.
Buy me a coffee!
If you want to say thanks or help, then you can feed my caffeine habit and buy me a coffee via PayPal with a one off donation to my PayPal tip jar. (Please note that PayPal doesn’t make it easy to respond to these so just know you are thanked in advance)
Join our Facebook Group
If you want to discuss anything you’ve read here on my website, or saw on my youtube channel, or if you want to share images you’ve created using any of my techniques or presets, then I’ve started a new Facebook Group just for that.
Note that this post contains paid affiliate links. We get a small commission for purchases made through these links, which helps run this site.


